
Ease up man.. It was not meant in all seriousness.
- Welcome to The Wilderness Guardians - OSRS Clan - PvP, PvM and More - OSRS Mobile Clans.
This section allows you to view all posts made by this member. Note that you can only see posts made in areas you currently have access to.
#2
Real Life Discussion / Re: Biggest Accomplishment Yet!
December 04, 2011, 09:30:23 PM
Making a full time job work along with friends and hobbies
#3
Guest Lounge / Re: I MET DRUMGUN@@
December 04, 2011, 08:29:13 PM
For odd reasons I do not respect Suomi as much as I respect Drumgun.
Same goes with Zezima. Zezima will always be da best in my opinion.
Dunno why... FANBOY ME!
Same goes with Zezima. Zezima will always be da best in my opinion.
Dunno why... FANBOY ME!
#4
Guest Lounge / Re: I MET DRUMGUN@@
December 04, 2011, 08:09:31 PM
OMG OMG OMG!!
#1 Summoner!
200m attack, str, def, hp, pray, mage, range, cook, hunter, fletch and ALMOST 200m wc..
Guy ownz!
#1 Summoner!
200m attack, str, def, hp, pray, mage, range, cook, hunter, fletch and ALMOST 200m wc..
Guy ownz!
#5
Guest Lounge / I MET DRUMGUN@@
December 04, 2011, 07:32:09 PM
OMG OMG OMG!!!
AND HE TALKED TO ME!!! @@@

AND HE TALKED TO ME!!! @@@


#7
Real Life Discussion / Re: New Rebecca Black...
November 16, 2011, 05:54:16 PM
I agree with Colin
#8
Real Life Discussion / Re: Post a picture of the girl/boy you like! :3
November 16, 2011, 10:14:30 AM #9
RuneScape Discussion / Re: Double loot Weekend
November 16, 2011, 07:54:30 AM
Went from 85 - 92 Dungeoneering and got myself roughly 400k tokens.
Not bad imo :)
Not bad imo :)
#10
Creative Corner / Re: Pretty Pictures
November 15, 2011, 06:09:59 PM
Took this one when I was in the Navy.. My unit climbed a mountain and thankfully I brought my camera.
#11
RuneScape Discussion / Re: Dicing nerfed
November 15, 2011, 06:04:29 PM
Runescape are going back to what it once was.. Based on normal players doing their thing LEGIT.
I like it.
I like it.

#13
Achievements / Re: Hurrr I'm a dragon lolz
September 28, 2011, 05:03:43 PM
I WAS THERE! I WAS THERE!
#14
Achievements / Re: My Hall of Fame
September 28, 2011, 01:51:02 PM
O.o
Quote from: JC on September 28, 2011, 11:17:07 AMQuote from: Dallar on September 28, 2011, 09:53:12 AM
My next 99 is not a combat skill.
Agility? ##
#15
Achievements / Re: My Hall of Fame
September 28, 2011, 09:53:12 AMQuote from: JC on September 28, 2011, 12:00:58 AM
I didn't realise you had a prayer cape Dallar, grats! ##
Got it a few hours ago ;)
Thanks bro!
Tom, I am.. Disliking pvp, I must be a skiller ;).. My next 99 is not a combat skill.


#17
Gaming / Re: SCARIEST GAME EVER.
September 26, 2011, 10:37:55 PM
The game would've been pretty nasty though :P
#18
House of Random / Re: What is your ghjjf name?
September 16, 2011, 07:17:04 PM
tgyhtgyh
(TEE-GEE-YEE-HEE-TEE-GEE-YEE-HEE)
(TEE-GEE-YEE-HEE-TEE-GEE-YEE-HEE)
#19
Guides / [color=limegreen][b][Minigame][/b][/color] Barbarian Assault - Tips and Tricks
July 30, 2011, 12:43:12 PM

Hello and welcome to another guide. This time I will focus on the activity Barbarian Assault. Barbarian Assault is a fun activity where cooperation and timing leads to success. You play in a team of 5 players who each are assigned 4 different roles. Hack, slash, poison and lure your way through the 10 waves to finally encounter the Penance queen who will fall at your feet after you have read this guide.
So why bother doing Barbarian Assault? This activity gives so many rewards but only a select few are very popular amongst the Runescape players. Most people does this activity to aid them in skill training but you can also get armor with cool stats and other rewards that serves as cosmetic rewards. I hope my experience will teach you a few things throughout this guide.

Barbarian Assault does not have any specific requirements but the higher combat stats you have, the easier the activity gets. The gameplay relies on your combat stats to be good because you will get attacked throughout the game which means the higher you are the easier you will get through. I will use the requirements to explain the best gear to wear within the minigame. Remember that capes cannot be worn within the activity so they will not be included on my gear-setups.
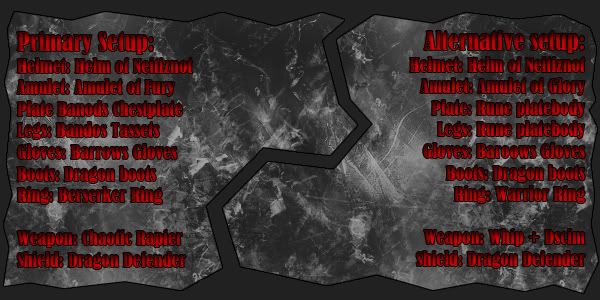
((Remember: Only use Chaotic Rapier if you play the Attacker role. If you play another role you don't need a weapon but most important is; Don't equip the Rapier if you are not going to use it.. You will waste charges if you wield it while getting attacked (Even if you aren't even attacking back)))

Take out your Games necklace and use it's teleport function to get to Barbarian Assault. You will now find yourself at the activity building. Run inside the building and down the ladder as shown below:
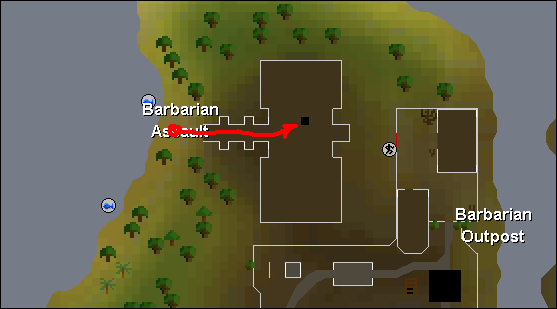
Now you will appear in a scoreboard room with a road leading north. Follow the path until you find yourself in a large area seperated into 11 smaller rooms. 10 rooms marked with the numbers 1-10 which is where you will be playing and a random room which serves no purpose. Run down to room 1 and enter the door. Upon entering it should look like this:
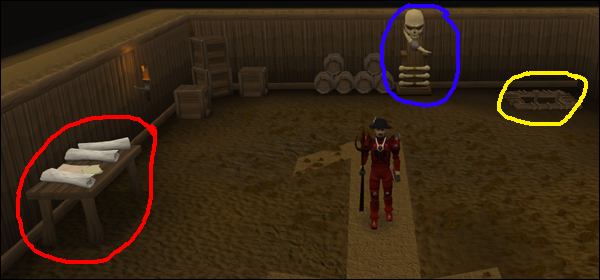
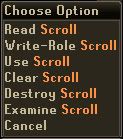
Red circle: This is the table where you pick up a Recruitment scroll. If you are going to be the leader you right-click the scroll and choose the "Write role option". Pick the role you are going to be. To add teamplayers to your team you simply use the scroll on the people you wish to recruit to your team.
Here's my recommendation for the team build throughout the 10 waves (You don't have to swtich to two healers in wave 8-9 if your healer is good at his/her work but it's really convenient having two Healers in wave 10 because of massive damage taken from the Penance queen's multi attacks.

Blue circle: Reward statue. This is very important because it's settings decides what kind of rewards you are going to get from completing the 10 waves.
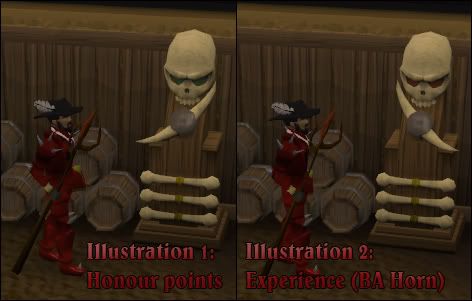
Illustration 1 - shows the Honour points setting which means that you will earn points which you can spend on cool cosmetics, levelling your BA role-level and combat equipment.
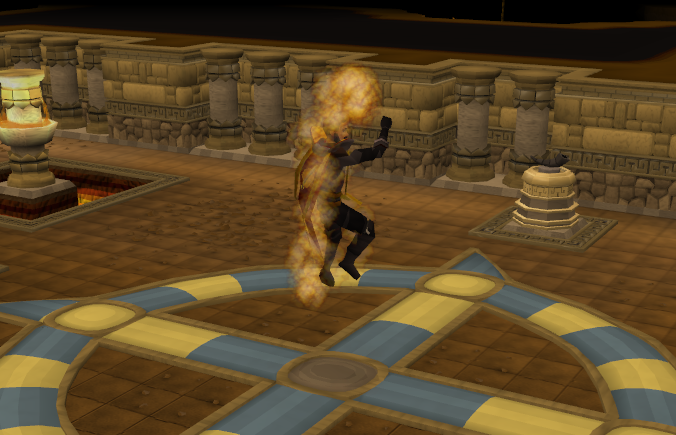
Illustration 2 - shows the Experience points setting which will fill up your Penance Horn. Remember that you must have bought the horn from Commander Connad who is located on the upper floor (Where you enter the dungeon) to fill it up. This setting is very popular because it aids you in three skills; Agility, mining and firemaking.. Very popular amongst people who wish a double exp boost that last for like 800k exp (At normal rate)
Yellow circle: When you are done building your team you descend this ladder to start the minigame.

When you descend the ladder you will notice two things; The horn in your inventory and the "Information list" on your top right corner next to the mini map (depicted above). You use the horn depending on what your info list tells you. What you shall focus on is what stands next to the ear and the mouth icon in the info list. The ear shows what you shall do and the mouth tells you what to call in your horn. These information's change for every 30 seconds so get familiar with this as fast as you can. Misinformation & no information at all is what kills the game. The horn icon shows who gives you the orders - So if you don't get your orders you know whose ass to kick. The first info on the list is selfaxplanatory.
Now that you know how that works I will go into details with each role. There are individual tactics for each of the roles so take your time to get familiar with the role you are going to play. You can read about the different roles below:

Role difficulty: Easy
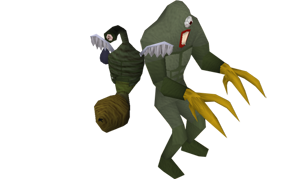
Strategy: The attackers role is to wipe out all the Melee and Ranged attacking monsters. The attacker role is very monotone meaning that you only have one objective; To take out all monsters asap which makes the attacking role easy.
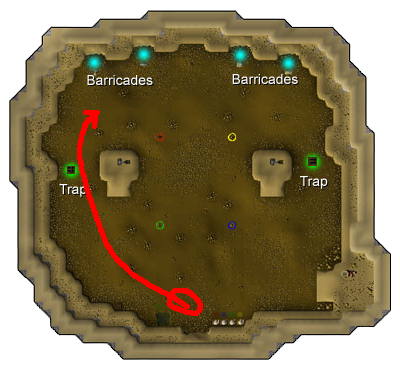
Tips: At the start of each wave you will follow the path given on the picture below. Doing this will not cause the Penance healers to pile the attacker which makes it an overall easier job for the healer to take out the Penance healers as soon as possible.
Remember, if you don't have a Chaotic Rapier you must bring weapons that fill out the requirements needed to do the Attacker role properly; Having all Attack styles covered. (You are covered if you bring the weapons I suggested in the requirements section)
OBS:
When you complete a wave you can do the "Leave/join team trick" to start the next wave faster instead of waiting for the count down. Simply have one of your team-mates leaving the team and rejoining when you wait for the next wave to begin. You save 15 seconds by doing this.

Role difficulty: Very easy
Strategy: The Collectors role is to gather eggs from slain monsters. The collectors role is very monotone and is regarded as the easiest role within this activity
Tips: You can prioritize your objective. The collector collects 3 different eggs; The red, the green and the blue. The red is by far the most important egg so whenever you get these assigned you must do your best to collect as many as possible. Greens are good too because they do poison damage. If you are to collect blue you don't have to stress too much. They are pretty much useless. Don't stress to load the cannon either.. It's not too important in the first 5-6 waves. Load when you feel like.
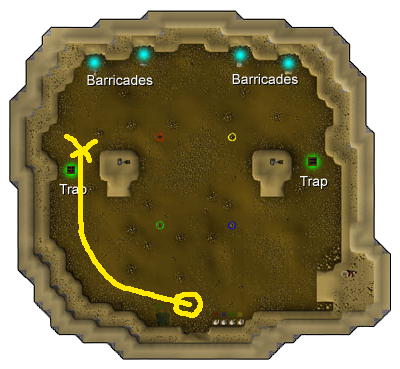
The path given is meant to show that the collector should follow the Attacker up to the place where I marked an X on the map above. At the beginning of each run the Collector should always stick close to the Attacker because the Attacker most likely is the one to perform a kill making it faster for the Collector to get his job done.
OBS:
When you complete a wave you can do the "Leave/join team trick" to start the next wave faster instead of waiting for the count down. Simply have one of your team-mates leaving the team and rejoining when you wait for the next wave to begin. You save 15 seconds by doing this.

Role difficulty: Hard
Strategy: The healer is my favorite role. Your objective is to heal others while poisoning the Penance healers with poisoned food. This role is not monotone because you have more than one objective which makes it a bit more difficult but if you like challenges it's a great role.
Tips: For the first 5 waves people shouldn't be needing your healing abilities which gives you plenty of freedom to do your other thing; poisoning Penance healers. (However you should always fill up your vial for safety measures) As soon as a wave starts you operate the Healers dispenser to get poisoned food. Use the correct food on the penance healers to poison them (2 pieces of poisoned food pr. Penance healer will kill them)
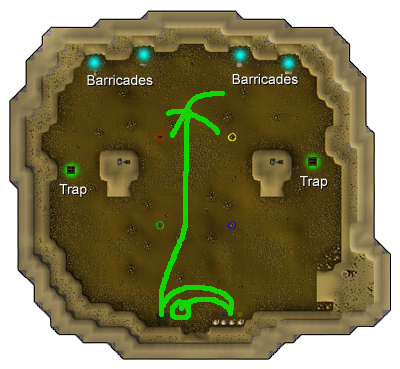
The path given is to show that you fill up your inventory with food before you fill your vial with healing water from the pond. You should be the only one who runs up via. the middle section of the map.
OBS:
When you complete a wave you can do the "Leave/join team trick" to start the next wave faster instead of waiting for the count down. Simply have one of your team-mates leaving the team and rejoining when you wait for the next wave to begin. You save 15 seconds by doing this.


Role difficulty: Hard
Strategy: The defender lures the Penance runners to traps on the eastern and the western side of the cavern by dropping the correct bait. Sometimes the traps will break and need repairing. This is considered the hardest of all 4 roles.
Tips: When you get your bait from the dispenser you are going to drop all the incorrect food when you run up to the trap. When a Penance runner eats the wrong bait it will run north instead of towards the escape hole.
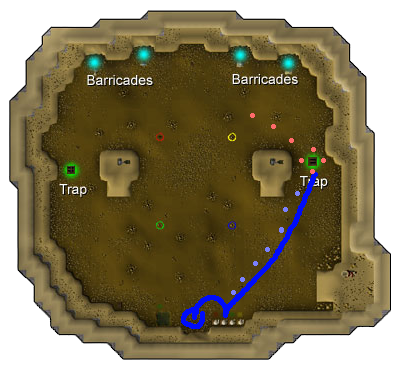
Please take note of the small dots I drew on the picture above. These small dots represent the food you drop. The blue dots are incorrect food that you are going to drop on your way to the trap. The red dots are correct food that you are going to drop north of the trap and around the trap. You gotta be fast when you drop the correct food because you wanna catch the runners before they run past the trap and end up in the south. That's where the incorrect food comes into play. When a penance runner eats incorrect it will run 5 paces to the north which will give you plenty of time to lure it with correct food. If the traps break you can collect the required items to repair it from the northern middle section of the ma.
OBS:
When you complete a wave you can do the "Leave/join team trick" to start the next wave faster instead of waiting for the count down. Simply have one of your team-mates leaving the team and rejoining when you wait for the next wave to begin. You save 15 seconds by doing this.


The wave starts out like normal where all the regular monster spawn. Just take them out like you are used to. When the Queen arrives don't panic. She is not that big a deal (But big enough to inflict serious damage over time) So the healer(s) must be on top of their game in this wave. I have written a step-by-step guide on how to handle the queen:
Step 1: The Collector picks up 8 yellow eggs dropped by the Penance queen. The collector gives the egg to the healer
Step 2: The healer dips the 8 eggs in the green bubbling pools and gives the poisoned eggs to the attacker
Step 3: The attacker adds 8 spikes (collected from the mushrooms) to the 8 eggs and passes them on to the Defender
Step 4: The Defender uses the 8 spiked poison eggs on a lava pool and passes them on to the Collector.
Step 5: The collector runs to the Cannon located on top of the hill and loads it with the 8 Omega eggs.
Step 6: Shoot the bastard and be victorious.
OBS:
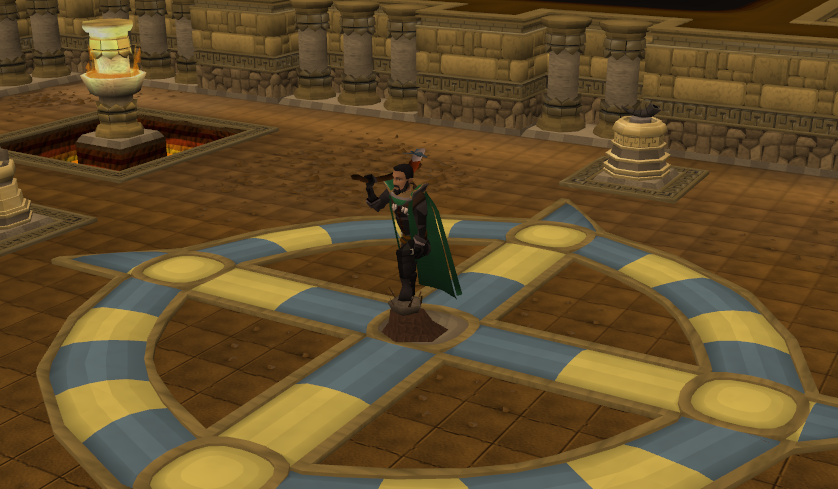
You can do the "Cannon trick" to kill the queen faster. Collect 4 omega eggs and load them into the cannon. Have someone to count down. At the count you all spam-click the "fire Omega egg" option which will cause the one Omega Eggs to be fired multiple times.

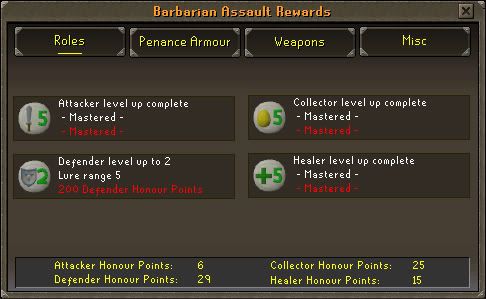
This is where you pay honour points to level up your BA roles. Below I have put up a chart where you can see the benefits of leveling up your roles:
Attacker:
Level 1: +10 Damage
Level 2: +20 Damage - (Costs 200 Honour points)
Level 3: +30 Damage - (Costs 300 Honour points)
Level 4: +40 Damage - (Costs 400 Honour points)
Level 5: +50 Damage - (Costs 500 Honour points)
Collector:
Level 1: Bag holds 2 eggs
Level 2: Bag holds 4 eggs - (Costs 200 Honour points)
Level 3: Bag holds 6 eggs - (Costs 300 Honour points)
Level 4: Bag holds 7 eggs - (Costs 400 Honour points)
Level 5: Bag holds 8 eggs - (Costs 500 Honour points)
Healer:
Level 1: Heal 100 lifepoints
Level 2: Heal 150 lifepoints - (Costs 200 Honour points)
Level 3: Heal 200 lifepoints - (Costs 300 Honour points)
Level 4: Heal 250 lifepoints - (Costs 400 Honour points)
Level 5: Heal 350 lifepoints - (Costs 500 Honour points)
Defender:
Level 1: Lure 4 spaces
Level 2: Lure 5 spaces - (Costs 200 Honour points)
Level 3: Lure 6 spaces - (Costs 300 Honour points)
Level 4: Lure 8 spaces - (Costs 400 Honour points)
Level 5: Lure 10 spaces - (Costs 500 Honour points)
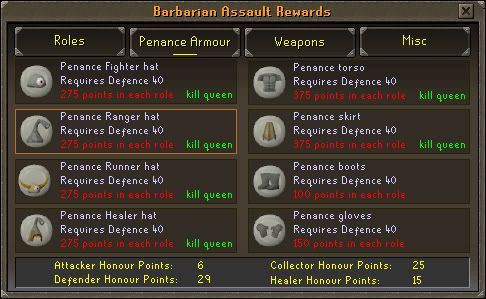
This is the outfit you can buy for Honour points. The Fighter torso is very popular amongst people who train combat stats because it has very good stats for that particular purpose. I won't go in details about that but I will show what you can buy here and what it'll do for you:
Runner boots - (Costs 100 Honour points in each class)
*Penance gloves - (Costs 150 Honour points in each class)
Granite body - (Costs 95k cash)
Fighter hat - (Costs 275 Honour points in each class)
Runner hat - (Costs 275 Honour points in each class)
Healer hat - (Costs 275 Honour points in each class)
*Penance torso - (Costs 275 Honour points in each class)
Penance skirt - (Costs 275 Honour points in each class)
Items marked with * are popular items outside BA
Wearing the full Penance set (boots, gloves, skirt, torso, and one of the hats) will restore a player's prayer points at a rate of 3 points per minute.

Penance Trident - (Costs 390 points in each class)
Penance egg paint - Colour your whip or Dark bow (Costs 50 points in any role)
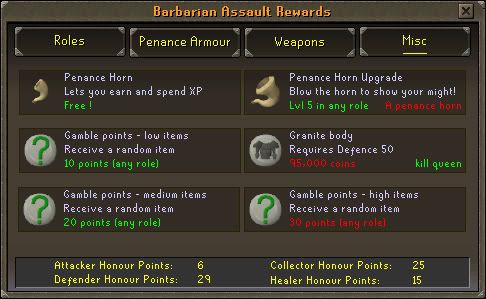
Penance Horn (Small) - You can get it for free
Master Penance Horn - Requires level 5 in one class to upgrade
Gamble low items (Don't!) - (10 points in any class)
Gamble medium items (Don't!) - (20 points in any class)
Gamble high items (Don't!) - (30 points in any class)
Hope you enjoyed this guide and it helped you.
- Dallar -
#20
Guides / [color=limegreen][b][Farming][/b][/color] Herbrunning - Indepth tips and tricks
July 28, 2011, 01:53:37 AM

Hi and welcome to my Herbrunning guide. Herbrunning is a simple thing to do and very straight forward yet I'd like to share some of my experience with this exceptionally great way to make riches ingame. Herb-running is not done for experience in the farming skill but for simple moneymaking or gathering of herblore ingredients – What you do with your yields is up to you. In this guide I will take you through some of the best ways to get the highest yield, what seeds are good to use and how you should handle the strategy behind Herb-runs. I hope I can open your eyes to new methods and maybe you will learn something.

There are always a few requirements that you need in order to do an activity. For this activity there are quite a few. You can do herbruns without most of them but I strongly recommend that you take your time to complete all of the listed missions. This guide depends on those items so if you choose to ignore some of the requirements this guide might become obsolete.

My arms Big Adventure quest guide - Needed for a 5th Herb patch
Fairy Tale Pt. 1 quest guide - Needed for Magic secateurs
Ghost Ahoy quest guide - Needed for the Ectophial

Lumbridge Task Guide - Needed for the Explorers Ring 3

61 Farming
74 Hunter
54 Herblore
59 Construction or 100k cash

Lightweight gear (Agile top and legs, Boots of lightness, penance gloves and spottier cape)
Falador shield 3/4 (Increases farming exp gained at Falador patches)

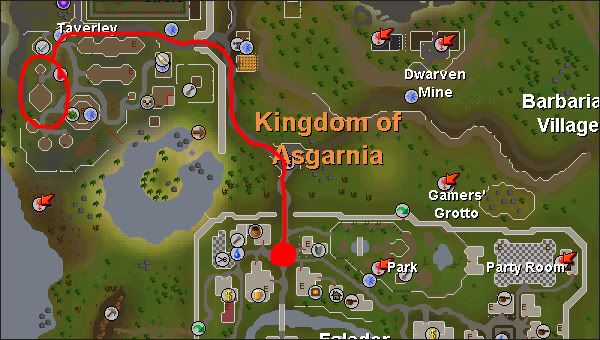
So now that you have all the levels and quests unlocked for the rest of this guide I will teach you how to make Juju Farming potions which will increase your yield tremendously when you are running your herb-runs. Juju potions are made within the Herblore Habitat which can be found south of Shilo Village.

It's not important what you are going to wear down there. You won't be running much which disables the need of leightweight gear. You don't need equpped tools or weapons so it's totally up to you how you will dress for this activity.
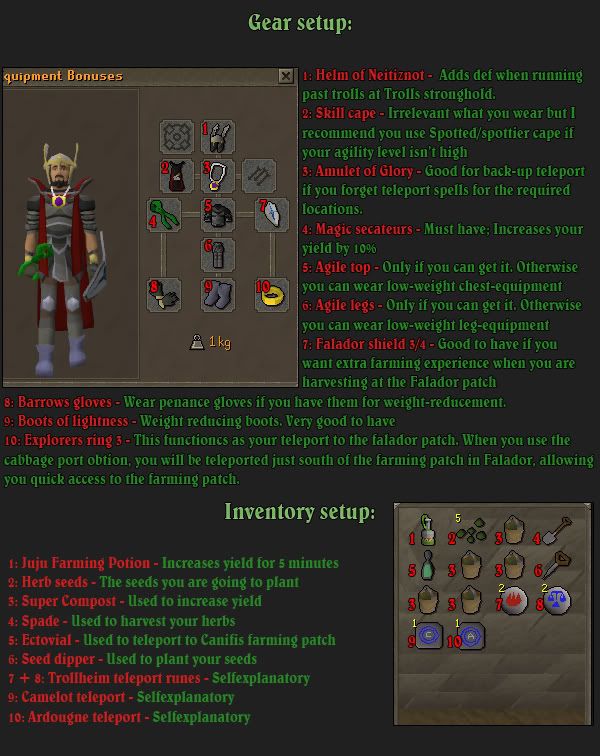
The inventory however, packs a few things that you need at Herblore habitat. The inventory I show in the picture below is not the complete list of items but you will get to buy the rest of the needed items down at the herblore habitat.. More on that later in the guide.
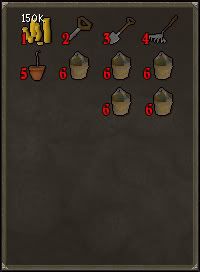
Cash because you will be spending money on equipment once you get to the herblore habitat. More on that to come.
2: Seed dipperYou will need your trusty Seed dipper
3: Spade You will need your trusty spade
4: Rake You will need your trusty rake.
5: Orange tree sabling An orange tree will be planted to attract the Igneous Jadinko's which you are going to catch within the herblore habitat.. More on that later
6: Supercompost Supercomposts doesn't have to be carried in the inventory though. If you are smart you store them in a tool leprechaun who also will be available at the Herblore habitat. That way you save inventory space.

From Falador you will travel to Taverly where you find Bettamax who sells you a teleport pouch to the Habitat for a small fee of 2000 gp pr. teleport.
When you have bought some of the small teleport pouches you use it to be teleported straight to the habitat. Upon arriving you will notice a Papa Mambo who dances a little north to you. Right click him and trade him. He will provide you all the items needed for Jadinko hunting. I suggest you buy the following items (Circled in red on the picture below)
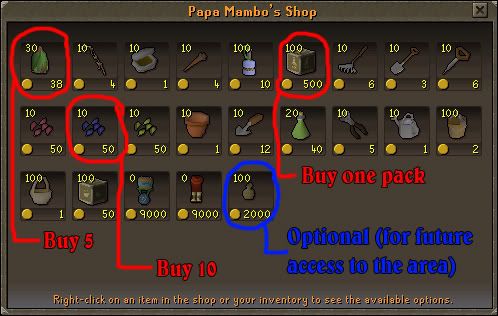
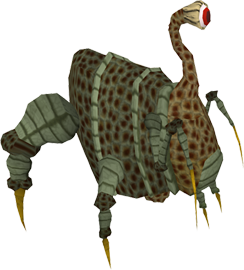
After buying the required items you are ready to hunt Jadinko's. Jadinko's are small dinosaur-like creatures who drop all the required ingredients for the Juju potions. I only focus on the relevant Jadinko's in this guide which is the Common Jadinko and the Igneous Jadinko. They are both relevant because they both drop a required ingredient for the Juju farming pot; The common Jadinko drops the Ugune seed which provides the Ugune herb and the Igneous Jadinko provides the Marble Vine (100% drop) which is the secondary ingredient for Juju farming potion. So how do you catch them?
From Papa Mambo you head south, climb the climbable vine and you should end up in this area:
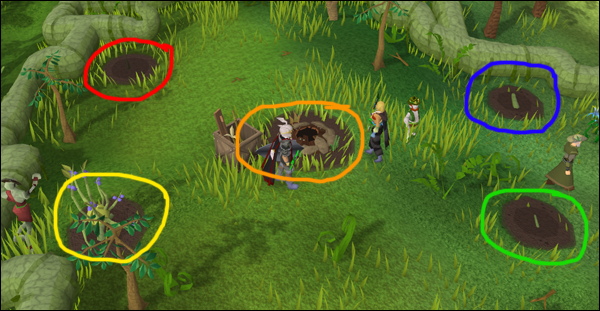
Red circle: Fruit tree patch. Plant your orange tree here. This patch also works for normal fruit tree farming so you are more than free to use this spot when you train your farming experience.
Yellow circle: Bush patch. When you get it from hunting Common Jadinko's you plant a Lergberry bush here.
Orange circle: Constructed habitat. You build a thermal vent here. The thermal will either require 59 construction or 59k to build. If you don't have the levels you don't have to worry. In this patch you construct a thermal vent.
Blue circle: Flower patch. Do you remember the blue blossom seed you bought from Papa Mambo? Plant that here.
Green circle: Vine patch. This is where you will plant your Ugune seed upon getting it from catching common Jadinko's.


What attracts this creature? - Blue blossom Vine (Does not have to be fully grown, the Jadinko's will be available as soon as you plant the blue blossom seed in the flower patch.
Where does it spawn? - Common Jadinko's spawn north of the patches (Jump over the climbable vine)
What to look out for? - Ugune and lergberry seeds (Good advice is to keep all your gatherings for future reference)
Common Jadinko's are going to be your first target. They drop all the seeds you need in order to proceed. Keep an eye out for the seeds you need for your potion which is Ugune seed (Potion ingredient) and Lergberry seed (Used to attract Igneous Jadinko's when planted in the bush patch). The way you catch them are similar to catching Chinchompas. You put down as many traps as you can and hope for the best.(Please note that getting Ugune seeds can be quite a pain)

What attracts this creature? - Blue blossom Vine, Thermal vent, Lergberry bush and Orange tree (Does not have to be fully grown, the Jadinko's will be available as soon as you plant all the seeds in the particular patches.
Where does it spawn? - Igneous Jadinko's spawn south of the patches (Jump over the climbable vine)
What to look out for? - Marble vines ((100% drop)Good advice is to keep all your gatherings for future reference)
Next up is Igneous Jadinko's. Unlike Common Jadinko's these are fast and doesn't require much effort seeing that the item you wanna loot from it is a 100% drop. I suggest you collect 50-100 Marble vines. The way you catch them are similar to catching Chinchompas. You put down as many traps as you can and hope for the best.

When you have gotten a Ugune seed you go plant it in the Vine patch (Marked green on the picture above) It'll take some time for it to grow (around 1 hour I believe) so you can just do other stuff while waiting for it to grow. When it's fully grown you harvest it like a normal herb and clean the leaves. If you haven't already - Bank the Juju vials and pull out a few of them. Now put your clean ugune herb into the Juju vial, then add a marble vine... You now have Juju farming potion! Congratualations!

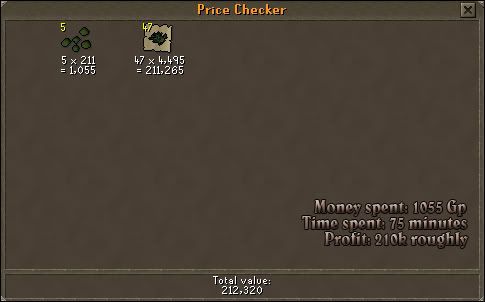
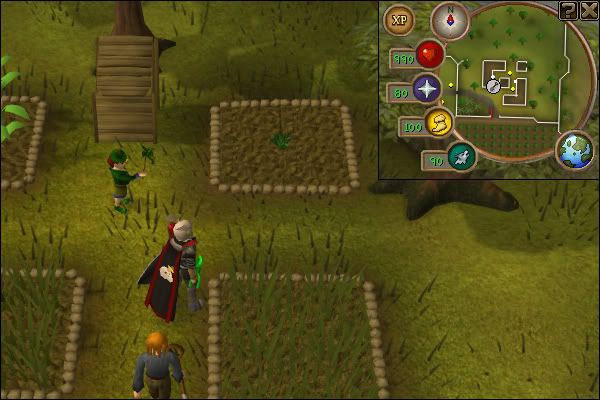
For my herb runs I use Toadflax. Toadflax seeds cost less than Toadflax herbs which you can see in the picture below. You will notice that I have put in 47 toadflax herbs as a comparison to the costs of one herb run. 47 Toadflax herbs is the amount of herbs I get from each run average. Highest amount I ever got was 59 and lowest was around 35.

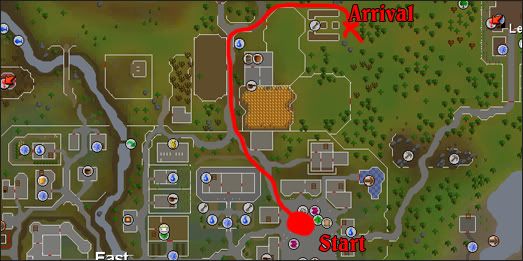
How to get there: Trollheim teleport (2 Fire runes, 2 Law runes)
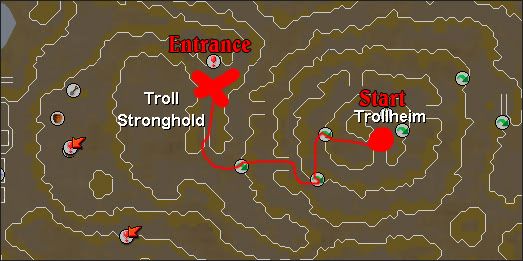
Important information: Don't drink your Juju potion before you are ready to harvest this patch. You will save time this way.
From this moment you are racing the time (5 minutes) because you drank one dose of your Juju Farming potion. This means that there has got to be no screwing around until you are done harvesting all patches. Now you teleport to the next location which is Canifis.

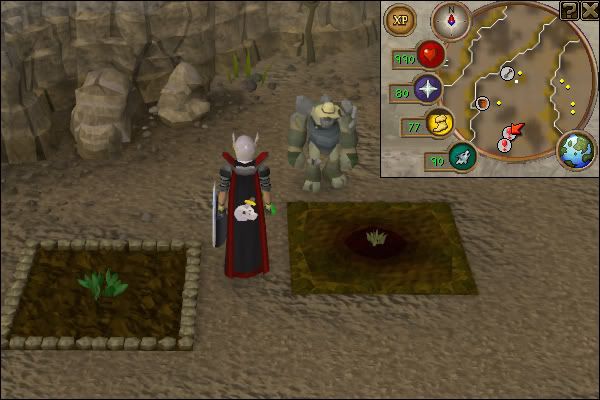
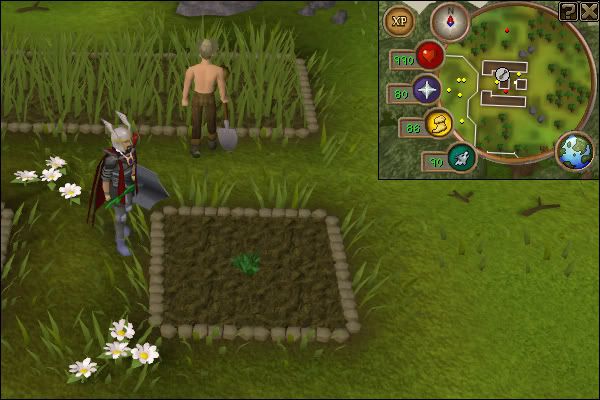
How to get there: Ectophial teleport
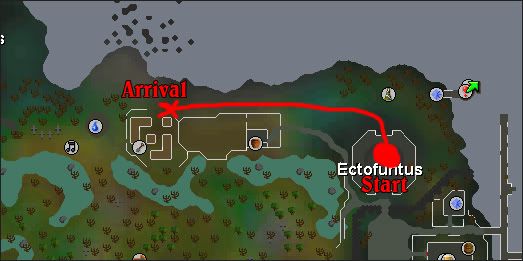
Important information: You are racing against time. Don't screw around - Just run directly to the patch and harvest.
If you find that your inventory is full because of your yields you can use the Tool leprechaun to note them (Use your herb on the tool leprechaun and he notes them free of charge)
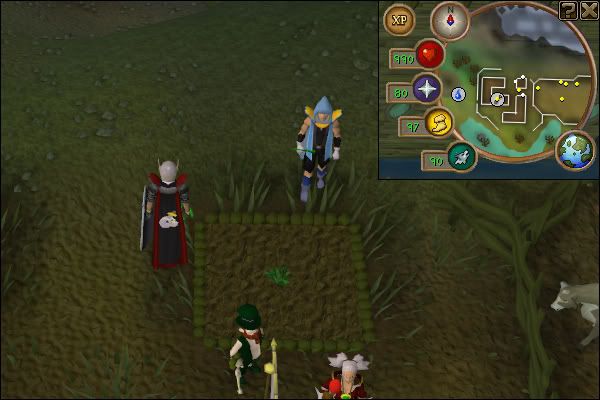

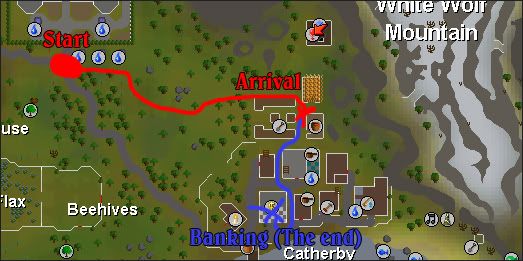
How to get there: Explorers Ring (Cabbage port)
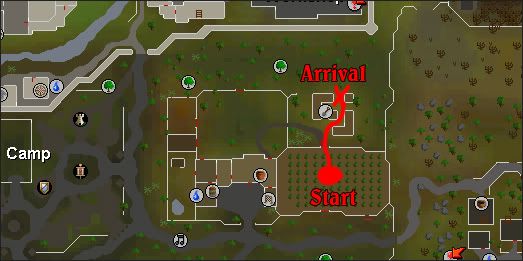
Important information: You are racing against time. Don't screw around - Just run directly to the patch and harvest.
If you find that your inventory is full because of your yields you can use the Tool leprechaun to note them (Use your herb on the tool leprechaun and he notes them free of charge)

How to get there: Ardougne Teleport tab
Important information: You are racing against time. Don't screw around - Just run directly to the patch and harvest.
If you find that your inventory is full because of your yields you can use the Tool leprechaun to note them (Use your herb on the tool leprechaun and he notes them free of charge)

How to get there: Camelot teleport tab
Important information: You are racing against time. Don't screw around - Just run directly to the patch and harvest.
If you find that your inventory is full because of your yields you can use the Tool leprechaun to note them (Use your herb on the tool leprechaun and he notes them free of charge)
Congratualations! You have completed a Herb run succesfully. Now you can wait 75 minutes until you can do the next lap. Right south of your ending location you can find a bank to bank/restock.
#21
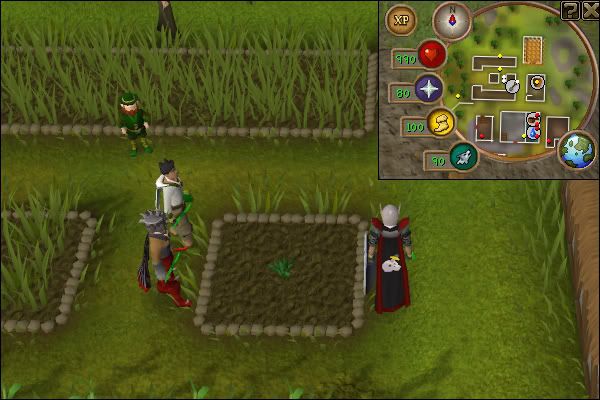
Blogs / Journey to Perfection [Revamped]
July 18, 2011, 05:23:49 PM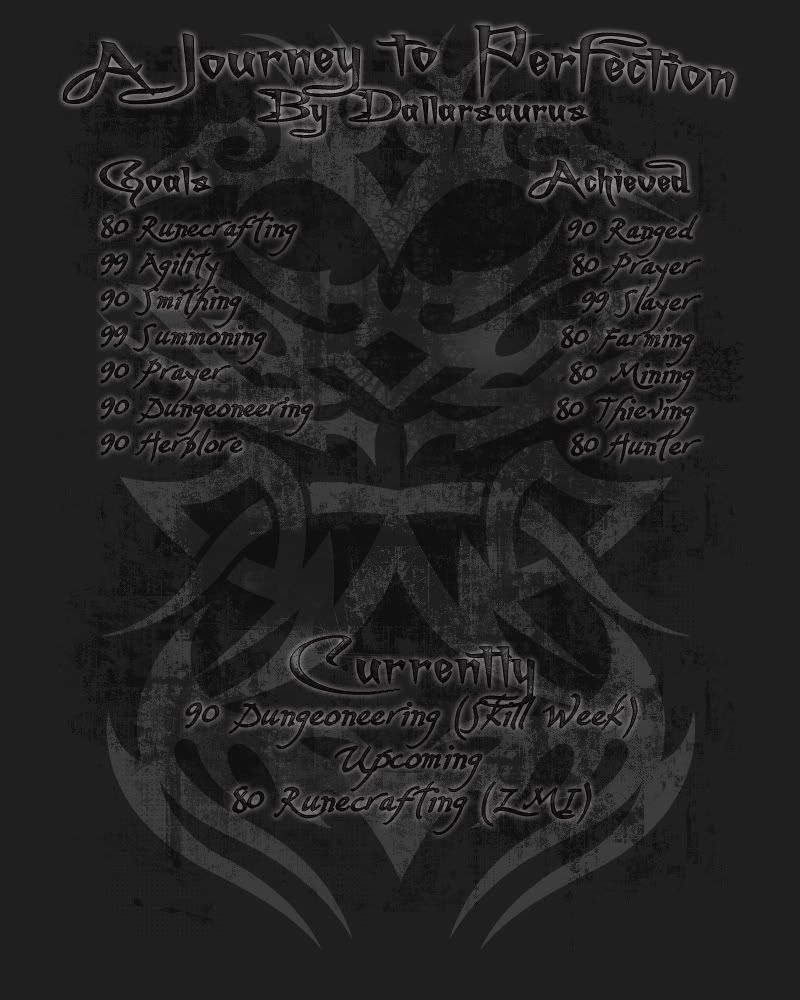

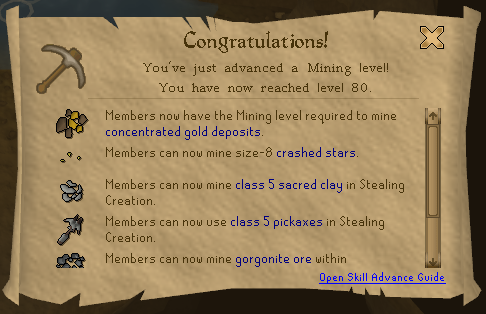
80 Mining
- Complete -
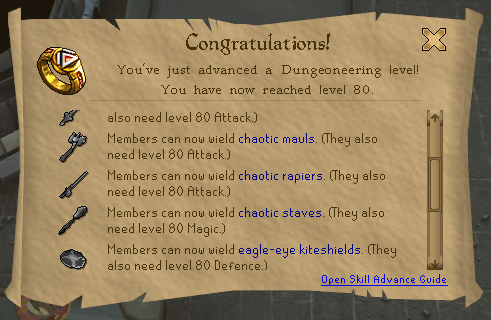
90 Dungeoneering

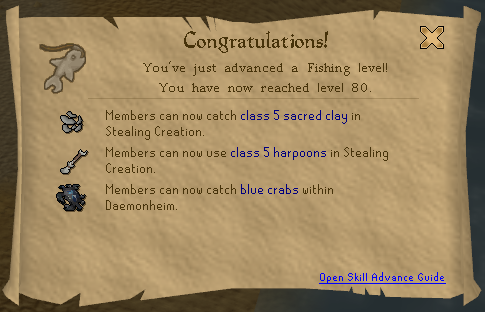
80 Fishing
- Complete -
80 Runecrafting

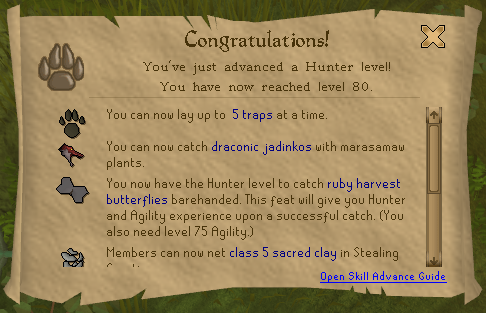
80 Hunter
- Complete -
80 Farmning
- Complete -
80 Herblore
- Complete -
80 Thieving

80 Crafting
- Complete -
80 Firemaking
- Complete -
80 Smithing
- Complete -
80 Mining
- Complete -
80 Construction
- Complete -
90 Summoning
- Complete -
90 Agility
- Complete -
80 Magic
- Complete -
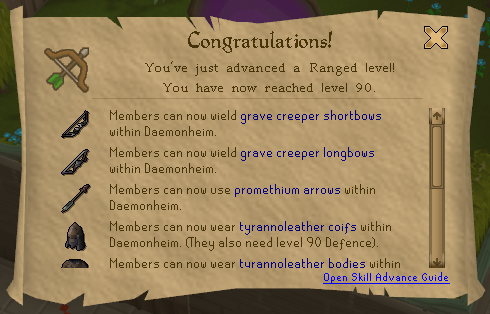
90 Ranged


#22
Media and Comedy / Gimme that gun
July 15, 2011, 05:01:53 PM #23
RuneScape Discussion / Re: Need Gear?
July 15, 2011, 03:18:42 PM
I do not support clan banks.
- Who can take from it
- Who will keep it running and keep flushing out money?
- Who will abuse it?
- When it's forgotten, who will make bank?
People should be responsible for their own items. Jean, I know you mean the best by this and I would be the last to accuse you of cheating in the end. I think you have the best intentions but we are a warring clan and people know/should know what they are in for when they apply. If people are insecure we could always host some of them non-risk fights.
That's my opinion. Good luck with this but I will not support it.
#24
House of Random / Re: NOTHING LEFT!!! + Dubstep = EPIC
July 10, 2011, 01:35:58 AM
Seriously Zeth... You are amazing..
Make a beat and I'll hop down into the studio and record some vocals on it. Preferably hiphop ;)
Make a beat and I'll hop down into the studio and record some vocals on it. Preferably hiphop ;)