- Welcome to The Wilderness Guardians - OSRS Clan - PvP, PvM and More - OSRS Mobile Clans.
This section allows you to view all posts made by this member. Note that you can only see posts made in areas you currently have access to.
Pages1
#1
Guest Lounge / I MET DRUMGUN@@
December 04, 2011, 07:32:09 PM #4
Guides / [color=limegreen][b][Minigame][/b][/color] Barbarian Assault - Tips and Tricks
July 30, 2011, 12:43:12 PM

Hello and welcome to another guide. This time I will focus on the activity Barbarian Assault. Barbarian Assault is a fun activity where cooperation and timing leads to success. You play in a team of 5 players who each are assigned 4 different roles. Hack, slash, poison and lure your way through the 10 waves to finally encounter the Penance queen who will fall at your feet after you have read this guide.
So why bother doing Barbarian Assault? This activity gives so many rewards but only a select few are very popular amongst the Runescape players. Most people does this activity to aid them in skill training but you can also get armor with cool stats and other rewards that serves as cosmetic rewards. I hope my experience will teach you a few things throughout this guide.

Barbarian Assault does not have any specific requirements but the higher combat stats you have, the easier the activity gets. The gameplay relies on your combat stats to be good because you will get attacked throughout the game which means the higher you are the easier you will get through. I will use the requirements to explain the best gear to wear within the minigame. Remember that capes cannot be worn within the activity so they will not be included on my gear-setups.
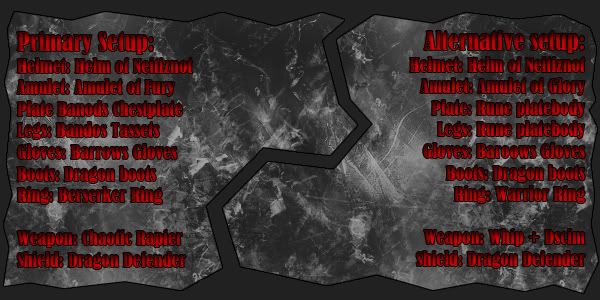
((Remember: Only use Chaotic Rapier if you play the Attacker role. If you play another role you don't need a weapon but most important is; Don't equip the Rapier if you are not going to use it.. You will waste charges if you wield it while getting attacked (Even if you aren't even attacking back)))

Take out your Games necklace and use it's teleport function to get to Barbarian Assault. You will now find yourself at the activity building. Run inside the building and down the ladder as shown below:
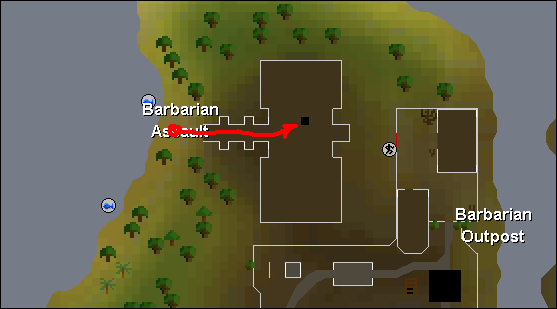
Now you will appear in a scoreboard room with a road leading north. Follow the path until you find yourself in a large area seperated into 11 smaller rooms. 10 rooms marked with the numbers 1-10 which is where you will be playing and a random room which serves no purpose. Run down to room 1 and enter the door. Upon entering it should look like this:
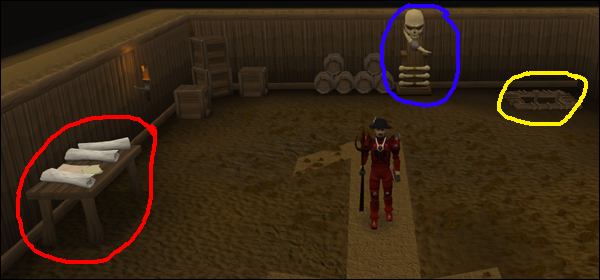
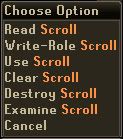
Red circle: This is the table where you pick up a Recruitment scroll. If you are going to be the leader you right-click the scroll and choose the "Write role option". Pick the role you are going to be. To add teamplayers to your team you simply use the scroll on the people you wish to recruit to your team.
Here's my recommendation for the team build throughout the 10 waves (You don't have to swtich to two healers in wave 8-9 if your healer is good at his/her work but it's really convenient having two Healers in wave 10 because of massive damage taken from the Penance queen's multi attacks.

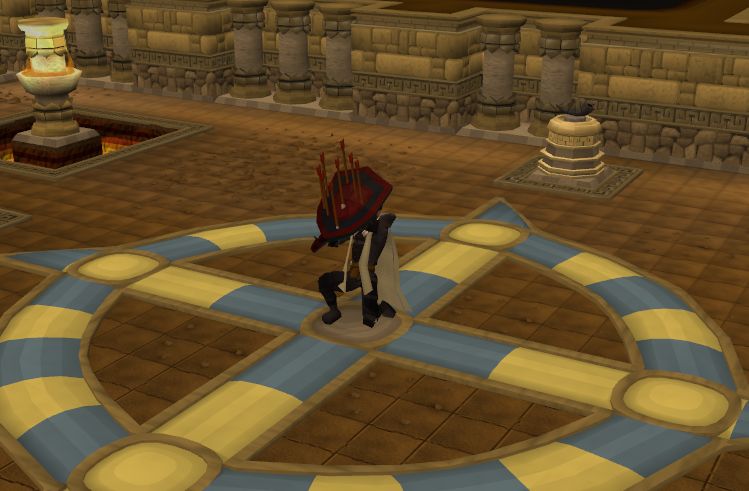
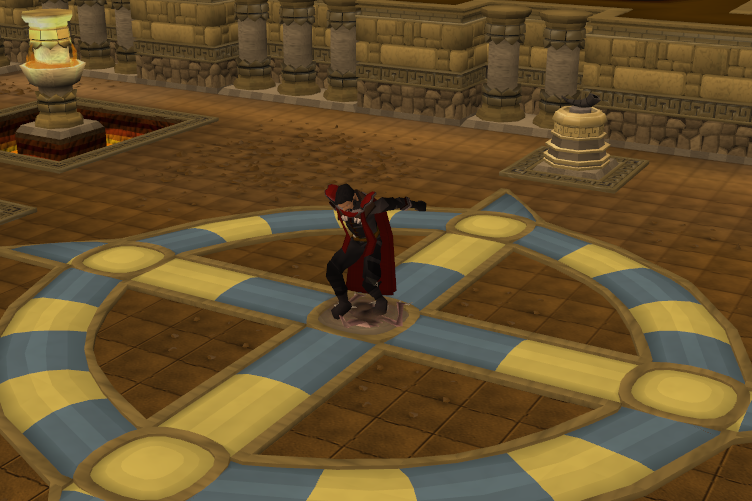
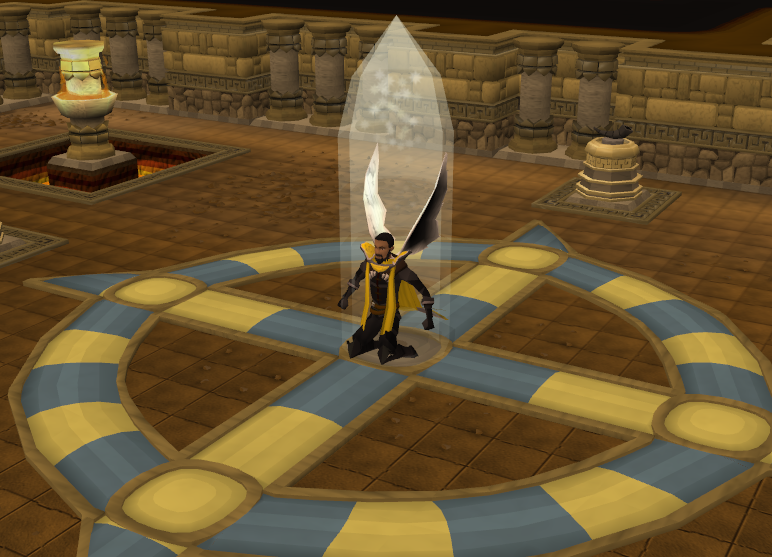
Blue circle: Reward statue. This is very important because it's settings decides what kind of rewards you are going to get from completing the 10 waves.
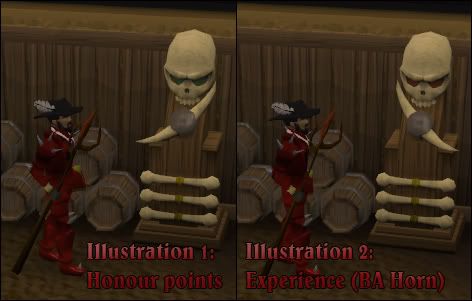
Illustration 1 - shows the Honour points setting which means that you will earn points which you can spend on cool cosmetics, levelling your BA role-level and combat equipment.
Illustration 2 - shows the Experience points setting which will fill up your Penance Horn. Remember that you must have bought the horn from Commander Connad who is located on the upper floor (Where you enter the dungeon) to fill it up. This setting is very popular because it aids you in three skills; Agility, mining and firemaking.. Very popular amongst people who wish a double exp boost that last for like 800k exp (At normal rate)
Yellow circle: When you are done building your team you descend this ladder to start the minigame.

When you descend the ladder you will notice two things; The horn in your inventory and the "Information list" on your top right corner next to the mini map (depicted above). You use the horn depending on what your info list tells you. What you shall focus on is what stands next to the ear and the mouth icon in the info list. The ear shows what you shall do and the mouth tells you what to call in your horn. These information's change for every 30 seconds so get familiar with this as fast as you can. Misinformation & no information at all is what kills the game. The horn icon shows who gives you the orders - So if you don't get your orders you know whose ass to kick. The first info on the list is selfaxplanatory.
Now that you know how that works I will go into details with each role. There are individual tactics for each of the roles so take your time to get familiar with the role you are going to play. You can read about the different roles below:

Role difficulty: Easy
Strategy: The attackers role is to wipe out all the Melee and Ranged attacking monsters. The attacker role is very monotone meaning that you only have one objective; To take out all monsters asap which makes the attacking role easy.
Tips: At the start of each wave you will follow the path given on the picture below. Doing this will not cause the Penance healers to pile the attacker which makes it an overall easier job for the healer to take out the Penance healers as soon as possible.
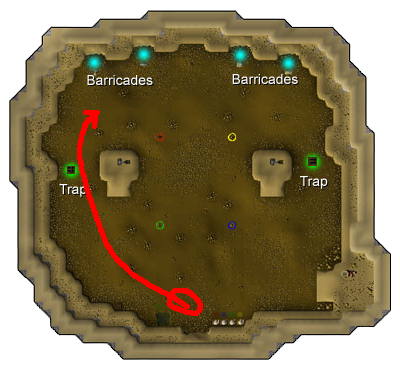
Remember, if you don't have a Chaotic Rapier you must bring weapons that fill out the requirements needed to do the Attacker role properly; Having all Attack styles covered. (You are covered if you bring the weapons I suggested in the requirements section)
OBS:
When you complete a wave you can do the "Leave/join team trick" to start the next wave faster instead of waiting for the count down. Simply have one of your team-mates leaving the team and rejoining when you wait for the next wave to begin. You save 15 seconds by doing this.
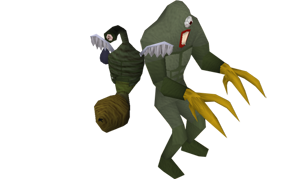

Role difficulty: Very easy
Strategy: The Collectors role is to gather eggs from slain monsters. The collectors role is very monotone and is regarded as the easiest role within this activity
Tips: You can prioritize your objective. The collector collects 3 different eggs; The red, the green and the blue. The red is by far the most important egg so whenever you get these assigned you must do your best to collect as many as possible. Greens are good too because they do poison damage. If you are to collect blue you don't have to stress too much. They are pretty much useless. Don't stress to load the cannon either.. It's not too important in the first 5-6 waves. Load when you feel like.
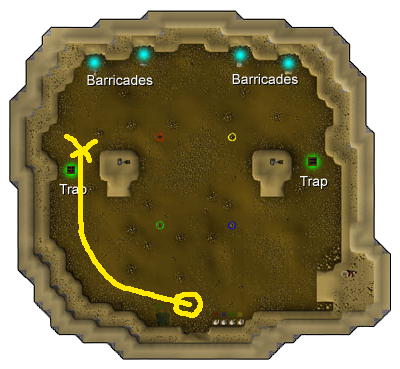
The path given is meant to show that the collector should follow the Attacker up to the place where I marked an X on the map above. At the beginning of each run the Collector should always stick close to the Attacker because the Attacker most likely is the one to perform a kill making it faster for the Collector to get his job done.
OBS:
When you complete a wave you can do the "Leave/join team trick" to start the next wave faster instead of waiting for the count down. Simply have one of your team-mates leaving the team and rejoining when you wait for the next wave to begin. You save 15 seconds by doing this.

Role difficulty: Hard
Strategy: The healer is my favorite role. Your objective is to heal others while poisoning the Penance healers with poisoned food. This role is not monotone because you have more than one objective which makes it a bit more difficult but if you like challenges it's a great role.
Tips: For the first 5 waves people shouldn't be needing your healing abilities which gives you plenty of freedom to do your other thing; poisoning Penance healers. (However you should always fill up your vial for safety measures) As soon as a wave starts you operate the Healers dispenser to get poisoned food. Use the correct food on the penance healers to poison them (2 pieces of poisoned food pr. Penance healer will kill them)
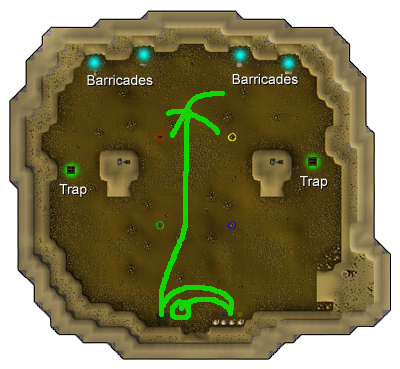
The path given is to show that you fill up your inventory with food before you fill your vial with healing water from the pond. You should be the only one who runs up via. the middle section of the map.
OBS:
When you complete a wave you can do the "Leave/join team trick" to start the next wave faster instead of waiting for the count down. Simply have one of your team-mates leaving the team and rejoining when you wait for the next wave to begin. You save 15 seconds by doing this.


Role difficulty: Hard
Strategy: The defender lures the Penance runners to traps on the eastern and the western side of the cavern by dropping the correct bait. Sometimes the traps will break and need repairing. This is considered the hardest of all 4 roles.
Tips: When you get your bait from the dispenser you are going to drop all the incorrect food when you run up to the trap. When a Penance runner eats the wrong bait it will run north instead of towards the escape hole.
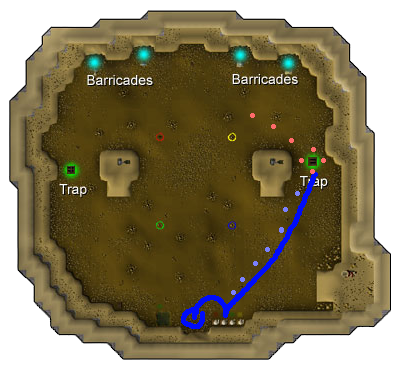
Please take note of the small dots I drew on the picture above. These small dots represent the food you drop. The blue dots are incorrect food that you are going to drop on your way to the trap. The red dots are correct food that you are going to drop north of the trap and around the trap. You gotta be fast when you drop the correct food because you wanna catch the runners before they run past the trap and end up in the south. That's where the incorrect food comes into play. When a penance runner eats incorrect it will run 5 paces to the north which will give you plenty of time to lure it with correct food. If the traps break you can collect the required items to repair it from the northern middle section of the ma.
OBS:
When you complete a wave you can do the "Leave/join team trick" to start the next wave faster instead of waiting for the count down. Simply have one of your team-mates leaving the team and rejoining when you wait for the next wave to begin. You save 15 seconds by doing this.
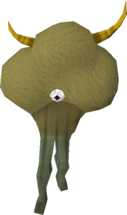

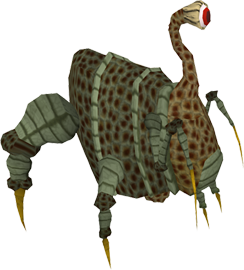
The wave starts out like normal where all the regular monster spawn. Just take them out like you are used to. When the Queen arrives don't panic. She is not that big a deal (But big enough to inflict serious damage over time) So the healer(s) must be on top of their game in this wave. I have written a step-by-step guide on how to handle the queen:
Step 1: The Collector picks up 8 yellow eggs dropped by the Penance queen. The collector gives the egg to the healer
Step 2: The healer dips the 8 eggs in the green bubbling pools and gives the poisoned eggs to the attacker
Step 3: The attacker adds 8 spikes (collected from the mushrooms) to the 8 eggs and passes them on to the Defender
Step 4: The Defender uses the 8 spiked poison eggs on a lava pool and passes them on to the Collector.
Step 5: The collector runs to the Cannon located on top of the hill and loads it with the 8 Omega eggs.
Step 6: Shoot the bastard and be victorious.
OBS:
You can do the "Cannon trick" to kill the queen faster. Collect 4 omega eggs and load them into the cannon. Have someone to count down. At the count you all spam-click the "fire Omega egg" option which will cause the one Omega Eggs to be fired multiple times.

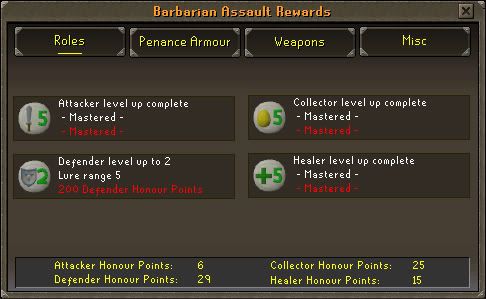
This is where you pay honour points to level up your BA roles. Below I have put up a chart where you can see the benefits of leveling up your roles:
Attacker:
Level 1: +10 Damage
Level 2: +20 Damage - (Costs 200 Honour points)
Level 3: +30 Damage - (Costs 300 Honour points)
Level 4: +40 Damage - (Costs 400 Honour points)
Level 5: +50 Damage - (Costs 500 Honour points)
Collector:
Level 1: Bag holds 2 eggs
Level 2: Bag holds 4 eggs - (Costs 200 Honour points)
Level 3: Bag holds 6 eggs - (Costs 300 Honour points)
Level 4: Bag holds 7 eggs - (Costs 400 Honour points)
Level 5: Bag holds 8 eggs - (Costs 500 Honour points)
Healer:
Level 1: Heal 100 lifepoints
Level 2: Heal 150 lifepoints - (Costs 200 Honour points)
Level 3: Heal 200 lifepoints - (Costs 300 Honour points)
Level 4: Heal 250 lifepoints - (Costs 400 Honour points)
Level 5: Heal 350 lifepoints - (Costs 500 Honour points)
Defender:
Level 1: Lure 4 spaces
Level 2: Lure 5 spaces - (Costs 200 Honour points)
Level 3: Lure 6 spaces - (Costs 300 Honour points)
Level 4: Lure 8 spaces - (Costs 400 Honour points)
Level 5: Lure 10 spaces - (Costs 500 Honour points)
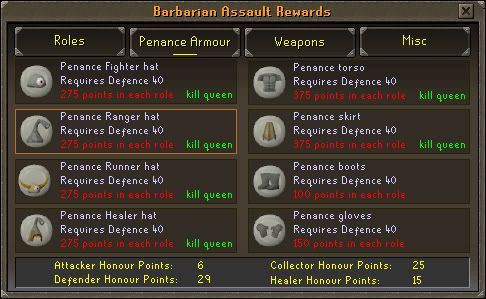
This is the outfit you can buy for Honour points. The Fighter torso is very popular amongst people who train combat stats because it has very good stats for that particular purpose. I won't go in details about that but I will show what you can buy here and what it'll do for you:
Runner boots - (Costs 100 Honour points in each class)
*Penance gloves - (Costs 150 Honour points in each class)
Granite body - (Costs 95k cash)
Fighter hat - (Costs 275 Honour points in each class)
Runner hat - (Costs 275 Honour points in each class)
Healer hat - (Costs 275 Honour points in each class)
*Penance torso - (Costs 275 Honour points in each class)
Penance skirt - (Costs 275 Honour points in each class)
Items marked with * are popular items outside BA
Wearing the full Penance set (boots, gloves, skirt, torso, and one of the hats) will restore a player's prayer points at a rate of 3 points per minute.
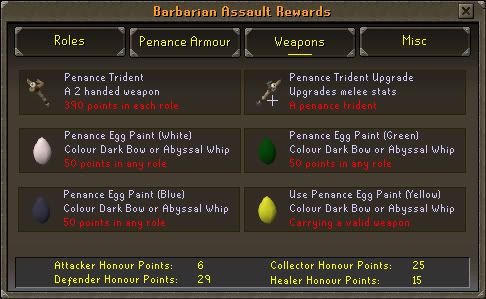
Penance Trident - (Costs 390 points in each class)
Penance egg paint - Colour your whip or Dark bow (Costs 50 points in any role)
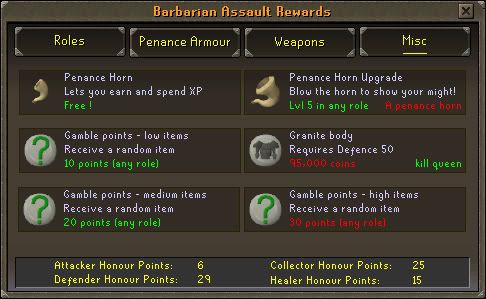
Penance Horn (Small) - You can get it for free
Master Penance Horn - Requires level 5 in one class to upgrade
Gamble low items (Don't!) - (10 points in any class)
Gamble medium items (Don't!) - (20 points in any class)
Gamble high items (Don't!) - (30 points in any class)
Hope you enjoyed this guide and it helped you.
- Dallar -
#5
Guides / [color=limegreen][b][Farming][/b][/color] Herbrunning - Indepth tips and tricks
July 28, 2011, 01:53:37 AM

Hi and welcome to my Herbrunning guide. Herbrunning is a simple thing to do and very straight forward yet I'd like to share some of my experience with this exceptionally great way to make riches ingame. Herb-running is not done for experience in the farming skill but for simple moneymaking or gathering of herblore ingredients – What you do with your yields is up to you. In this guide I will take you through some of the best ways to get the highest yield, what seeds are good to use and how you should handle the strategy behind Herb-runs. I hope I can open your eyes to new methods and maybe you will learn something.

There are always a few requirements that you need in order to do an activity. For this activity there are quite a few. You can do herbruns without most of them but I strongly recommend that you take your time to complete all of the listed missions. This guide depends on those items so if you choose to ignore some of the requirements this guide might become obsolete.

My arms Big Adventure quest guide - Needed for a 5th Herb patch
Fairy Tale Pt. 1 quest guide - Needed for Magic secateurs
Ghost Ahoy quest guide - Needed for the Ectophial

Lumbridge Task Guide - Needed for the Explorers Ring 3

61 Farming
74 Hunter
54 Herblore
59 Construction or 100k cash

Lightweight gear (Agile top and legs, Boots of lightness, penance gloves and spottier cape)
Falador shield 3/4 (Increases farming exp gained at Falador patches)

So now that you have all the levels and quests unlocked for the rest of this guide I will teach you how to make Juju Farming potions which will increase your yield tremendously when you are running your herb-runs. Juju potions are made within the Herblore Habitat which can be found south of Shilo Village.

It's not important what you are going to wear down there. You won't be running much which disables the need of leightweight gear. You don't need equpped tools or weapons so it's totally up to you how you will dress for this activity.
The inventory however, packs a few things that you need at Herblore habitat. The inventory I show in the picture below is not the complete list of items but you will get to buy the rest of the needed items down at the herblore habitat.. More on that later in the guide.
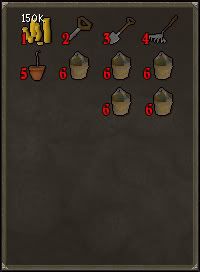
Cash because you will be spending money on equipment once you get to the herblore habitat. More on that to come.
2: Seed dipperYou will need your trusty Seed dipper
3: Spade You will need your trusty spade
4: Rake You will need your trusty rake.
5: Orange tree sabling An orange tree will be planted to attract the Igneous Jadinko's which you are going to catch within the herblore habitat.. More on that later
6: Supercompost Supercomposts doesn't have to be carried in the inventory though. If you are smart you store them in a tool leprechaun who also will be available at the Herblore habitat. That way you save inventory space.

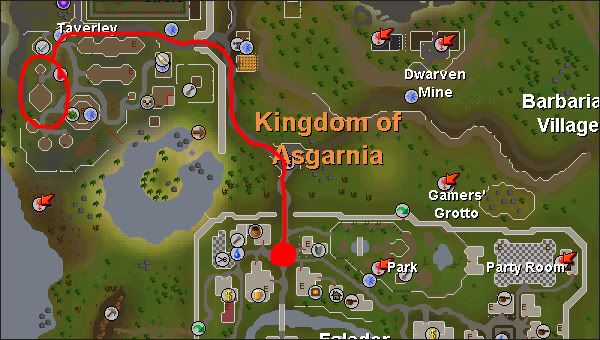
From Falador you will travel to Taverly where you find Bettamax who sells you a teleport pouch to the Habitat for a small fee of 2000 gp pr. teleport.
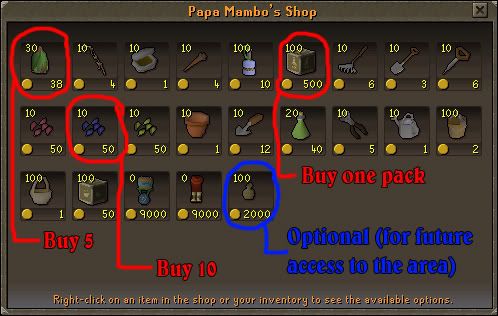
When you have bought some of the small teleport pouches you use it to be teleported straight to the habitat. Upon arriving you will notice a Papa Mambo who dances a little north to you. Right click him and trade him. He will provide you all the items needed for Jadinko hunting. I suggest you buy the following items (Circled in red on the picture below)
After buying the required items you are ready to hunt Jadinko's. Jadinko's are small dinosaur-like creatures who drop all the required ingredients for the Juju potions. I only focus on the relevant Jadinko's in this guide which is the Common Jadinko and the Igneous Jadinko. They are both relevant because they both drop a required ingredient for the Juju farming pot; The common Jadinko drops the Ugune seed which provides the Ugune herb and the Igneous Jadinko provides the Marble Vine (100% drop) which is the secondary ingredient for Juju farming potion. So how do you catch them?
From Papa Mambo you head south, climb the climbable vine and you should end up in this area:
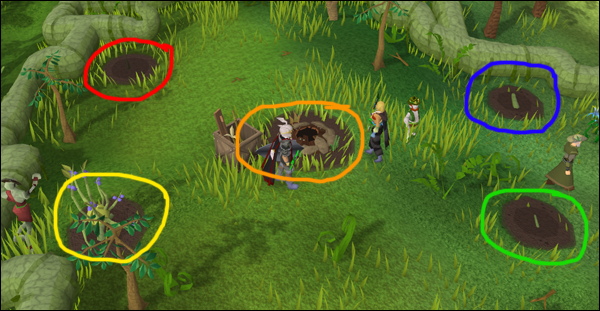
Red circle: Fruit tree patch. Plant your orange tree here. This patch also works for normal fruit tree farming so you are more than free to use this spot when you train your farming experience.
Yellow circle: Bush patch. When you get it from hunting Common Jadinko's you plant a Lergberry bush here.
Orange circle: Constructed habitat. You build a thermal vent here. The thermal will either require 59 construction or 59k to build. If you don't have the levels you don't have to worry. In this patch you construct a thermal vent.
Blue circle: Flower patch. Do you remember the blue blossom seed you bought from Papa Mambo? Plant that here.
Green circle: Vine patch. This is where you will plant your Ugune seed upon getting it from catching common Jadinko's.


What attracts this creature? - Blue blossom Vine (Does not have to be fully grown, the Jadinko's will be available as soon as you plant the blue blossom seed in the flower patch.
Where does it spawn? - Common Jadinko's spawn north of the patches (Jump over the climbable vine)
What to look out for? - Ugune and lergberry seeds (Good advice is to keep all your gatherings for future reference)
Common Jadinko's are going to be your first target. They drop all the seeds you need in order to proceed. Keep an eye out for the seeds you need for your potion which is Ugune seed (Potion ingredient) and Lergberry seed (Used to attract Igneous Jadinko's when planted in the bush patch). The way you catch them are similar to catching Chinchompas. You put down as many traps as you can and hope for the best.(Please note that getting Ugune seeds can be quite a pain)

What attracts this creature? - Blue blossom Vine, Thermal vent, Lergberry bush and Orange tree (Does not have to be fully grown, the Jadinko's will be available as soon as you plant all the seeds in the particular patches.
Where does it spawn? - Igneous Jadinko's spawn south of the patches (Jump over the climbable vine)
What to look out for? - Marble vines ((100% drop)Good advice is to keep all your gatherings for future reference)
Next up is Igneous Jadinko's. Unlike Common Jadinko's these are fast and doesn't require much effort seeing that the item you wanna loot from it is a 100% drop. I suggest you collect 50-100 Marble vines. The way you catch them are similar to catching Chinchompas. You put down as many traps as you can and hope for the best.

When you have gotten a Ugune seed you go plant it in the Vine patch (Marked green on the picture above) It'll take some time for it to grow (around 1 hour I believe) so you can just do other stuff while waiting for it to grow. When it's fully grown you harvest it like a normal herb and clean the leaves. If you haven't already - Bank the Juju vials and pull out a few of them. Now put your clean ugune herb into the Juju vial, then add a marble vine... You now have Juju farming potion! Congratualations!

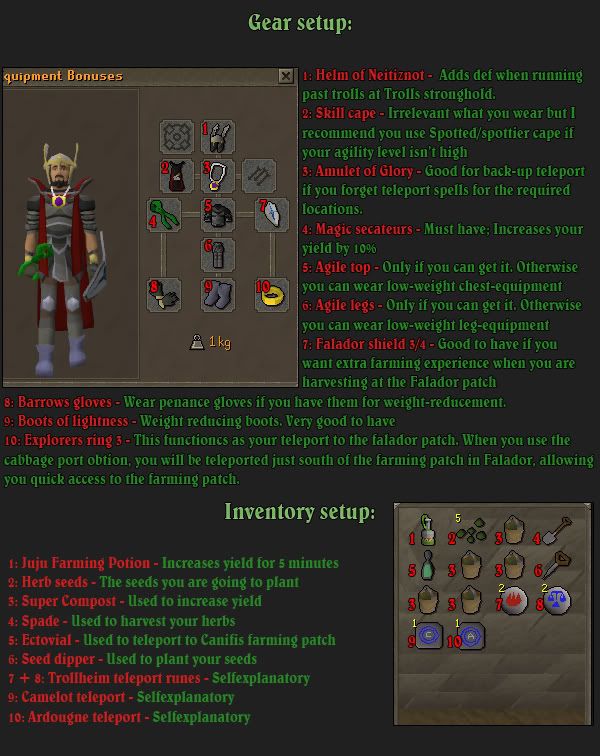
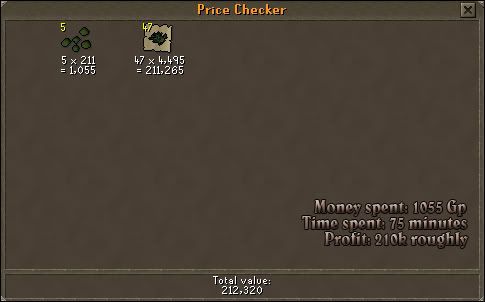
For my herb runs I use Toadflax. Toadflax seeds cost less than Toadflax herbs which you can see in the picture below. You will notice that I have put in 47 toadflax herbs as a comparison to the costs of one herb run. 47 Toadflax herbs is the amount of herbs I get from each run average. Highest amount I ever got was 59 and lowest was around 35.

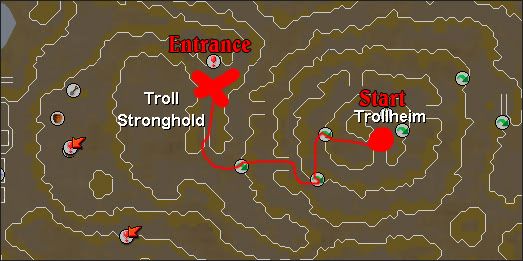
How to get there: Trollheim teleport (2 Fire runes, 2 Law runes)
Important information: Don't drink your Juju potion before you are ready to harvest this patch. You will save time this way.
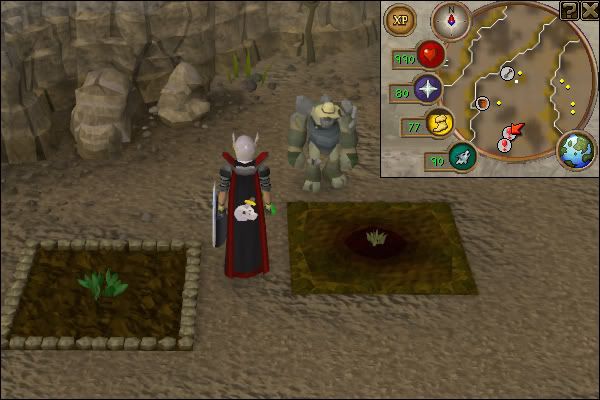
From this moment you are racing the time (5 minutes) because you drank one dose of your Juju Farming potion. This means that there has got to be no screwing around until you are done harvesting all patches. Now you teleport to the next location which is Canifis.

How to get there: Ectophial teleport
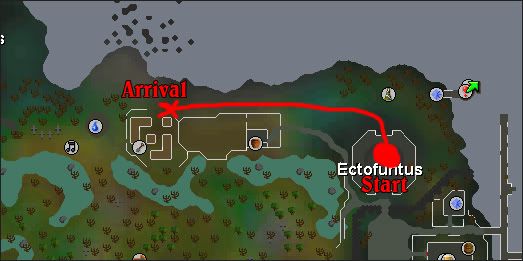
Important information: You are racing against time. Don't screw around - Just run directly to the patch and harvest.
If you find that your inventory is full because of your yields you can use the Tool leprechaun to note them (Use your herb on the tool leprechaun and he notes them free of charge)
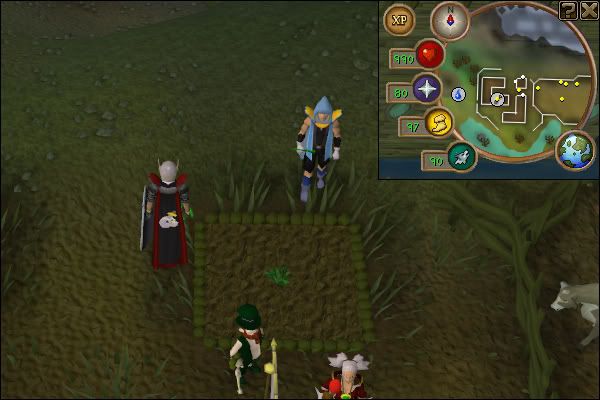

How to get there: Explorers Ring (Cabbage port)
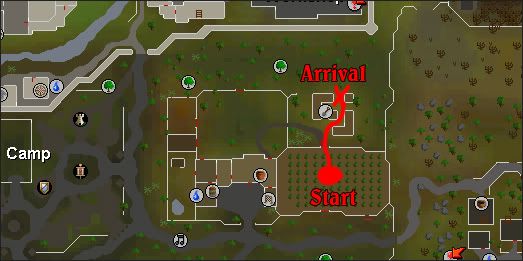
Important information: You are racing against time. Don't screw around - Just run directly to the patch and harvest.
If you find that your inventory is full because of your yields you can use the Tool leprechaun to note them (Use your herb on the tool leprechaun and he notes them free of charge)
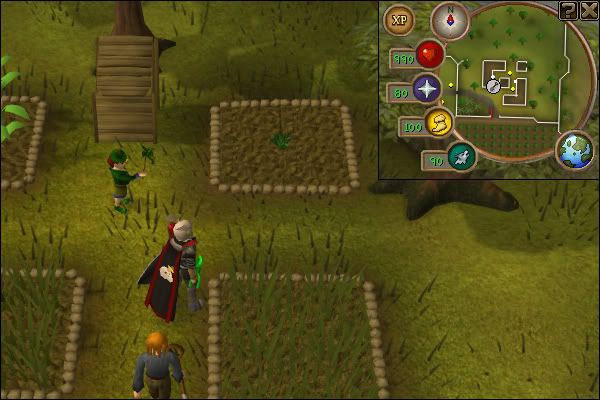

How to get there: Ardougne Teleport tab
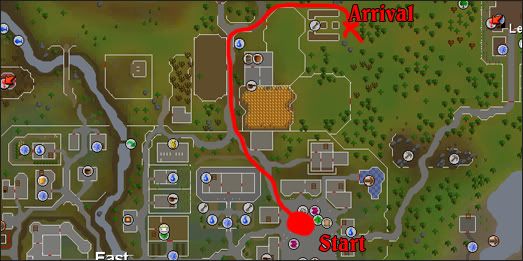
Important information: You are racing against time. Don't screw around - Just run directly to the patch and harvest.
If you find that your inventory is full because of your yields you can use the Tool leprechaun to note them (Use your herb on the tool leprechaun and he notes them free of charge)
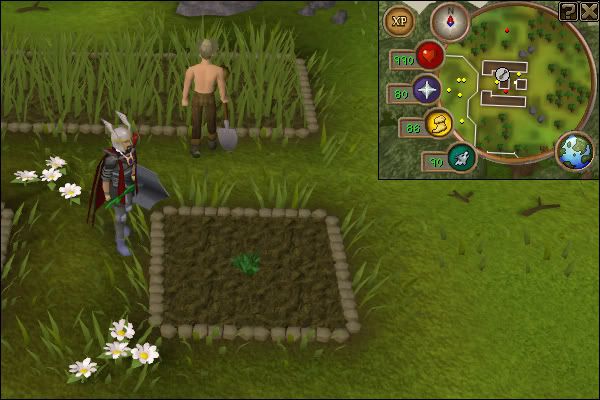

How to get there: Camelot teleport tab
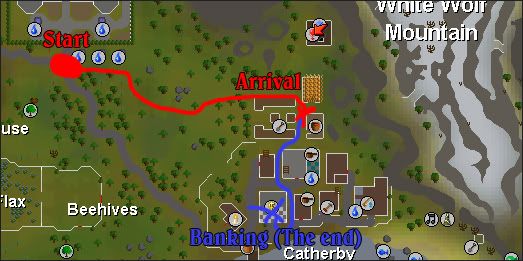
Important information: You are racing against time. Don't screw around - Just run directly to the patch and harvest.
If you find that your inventory is full because of your yields you can use the Tool leprechaun to note them (Use your herb on the tool leprechaun and he notes them free of charge)
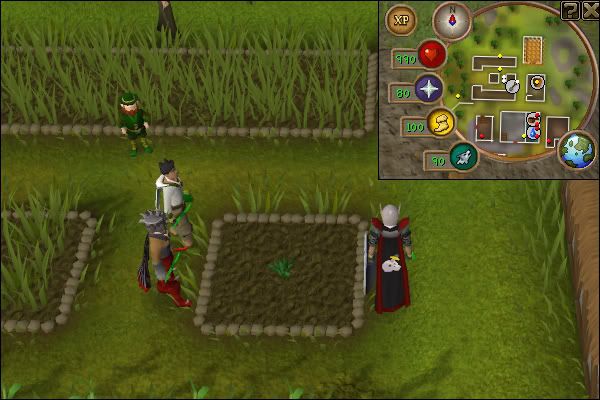
Congratualations! You have completed a Herb run succesfully. Now you can wait 75 minutes until you can do the next lap. Right south of your ending location you can find a bank to bank/restock.
#6
Blogs / Journey to Perfection [Revamped]
July 18, 2011, 05:23:49 PM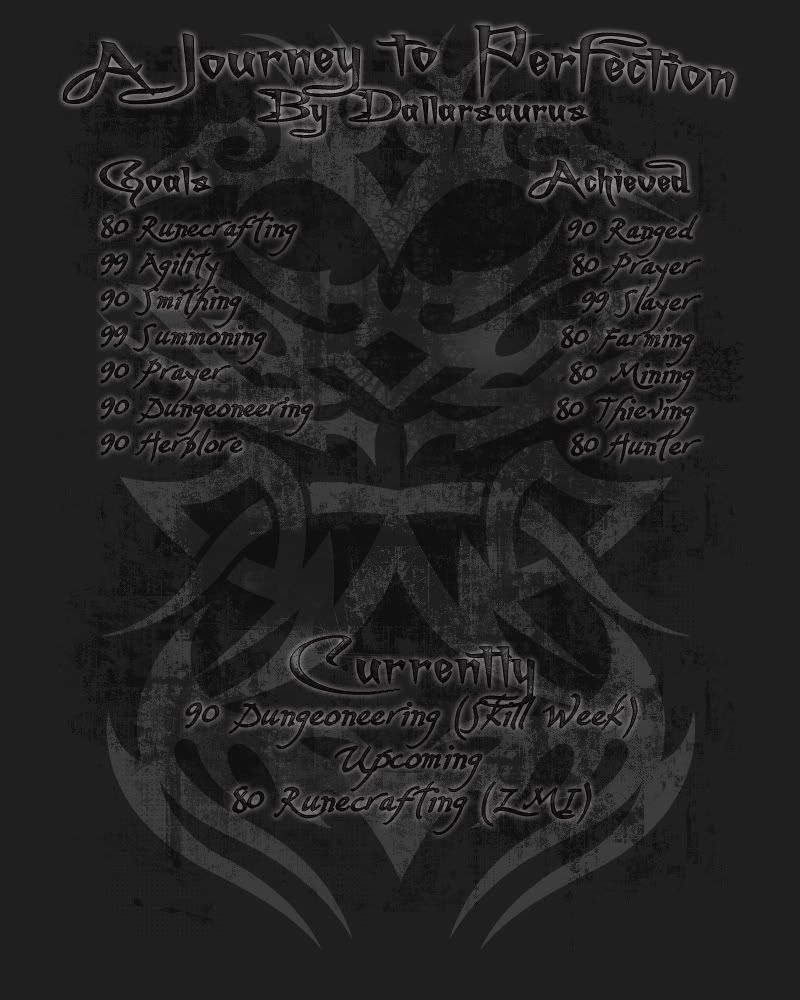

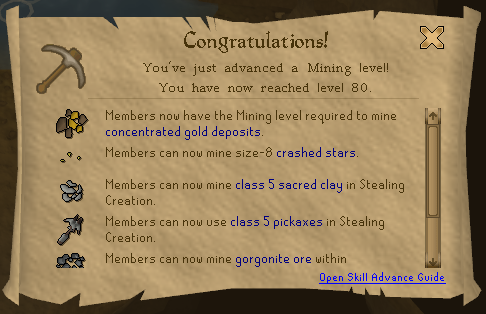
80 Mining
- Complete -
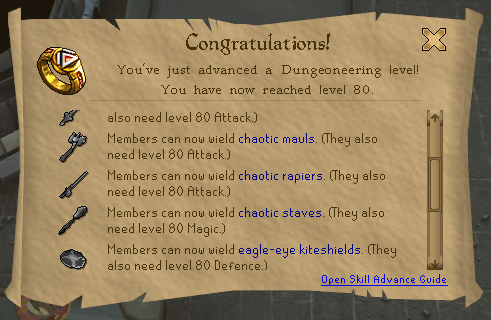
90 Dungeoneering

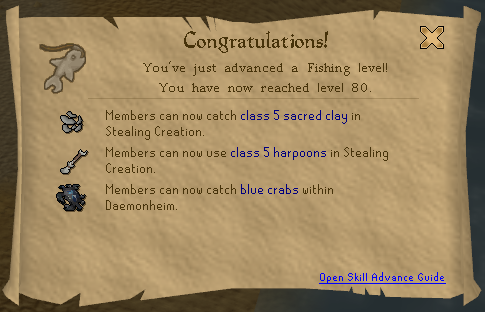
80 Fishing
- Complete -
80 Runecrafting

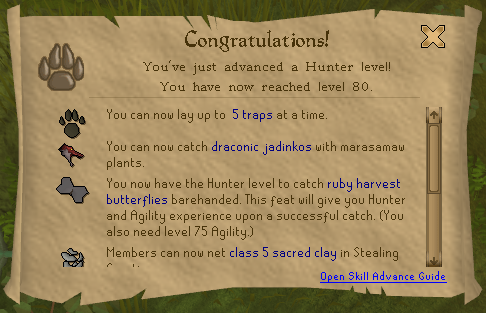
80 Hunter
- Complete -
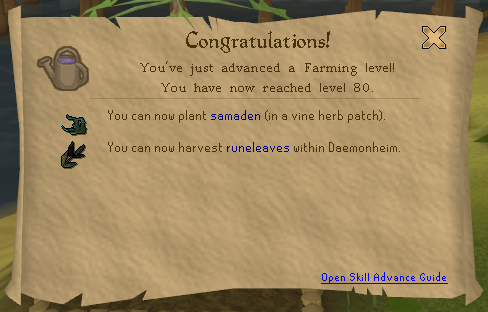
80 Farmning
- Complete -
80 Herblore
- Complete -
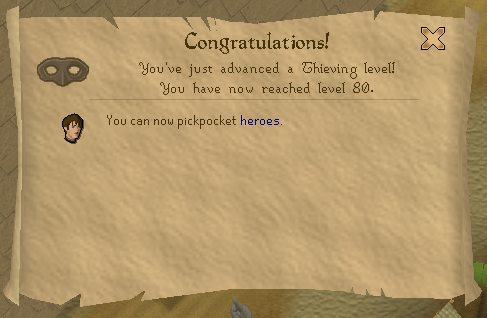
80 Thieving

80 Crafting
- Complete -
80 Firemaking
- Complete -
80 Smithing
- Complete -
80 Mining
- Complete -
80 Construction
- Complete -
90 Summoning
- Complete -
90 Agility
- Complete -
80 Magic
- Complete -
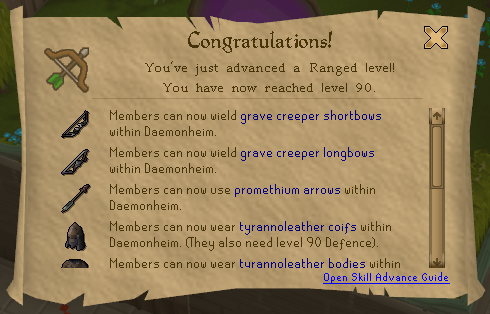
90 Ranged






#7
Media and Comedy / Gimme that gun
July 15, 2011, 05:01:53 PM #9
Guides / [color=limegreen][b][Dungeoneering][/b][/color] Indepth tips and tricks
June 29, 2011, 02:26:09 PM

You start out by going to the place where Dungeoneering takes place; Daemonheim. There are a few facilities here you must be aware of before you start. The location of all NPC's are good to know when you are here if you want to check amount of tokens, bank stuff, repair equipment etc. In the picture below I will show you where everything takes place within Daemonheim.
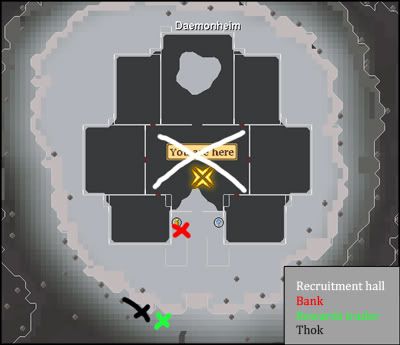
Recruitment hall: In here you start dungeoneering. All parties are formed in the spot marked with a white X.
Bank: Go here if you need banking. You cannot take anything but the Ring of kinship inside the dungeon.
Rewards trainer: He trades you the cool rewards for tokens. He also is responsible for the repair of your chaotic weapon rewards if they break.
Thok: He is the holder of the dungeoneering cape and an important part of the newly released Fremmenik sagas.
SO when you feel you are familiar with the place you are ready to go!
When you enter dungeoneering there are one thing you must make up with yourself. Do you want to be the host of your own team or would you like join someones team. There are pro's and con's about both but overall being a leader takes alot more responsibility. I'll start this guide out by explaining how to host a team and how all the mechanics work. When you host a team you must realise there are some "unwritten laws" you must abide by in order for it to be a succes..
1. The party leader is expected to be "Keyer" if nothing else has been negotiated.
You can find information on how to be "Keyer" under Raiding a Dungeon -> Team roles.
2. The party leader are responsible for finding solid teams who doesn't quit in the middle of the dungeon.
Be selective when you recruit your party members. You are more than welcome to put level requirements on your teams. These are very popular since people will be more attracted by a level 130 combat level requirement team rather than a mixed team (You might get unlucky and recruit a level 60 combat who won't really contribute to the overall teamwork. Other than that you can require that people have the "Shadowsilk hood" binded. You can find information about this item under Raiding a Dungeon -> Items to go for.
3. The party leader must act mature no matter what personality joins your party.
If you can act mature and have a sense of overall humour, people will find the company nice and you will have an overall better chance of succeeding a dungeon.
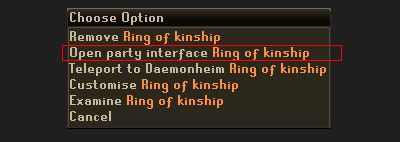
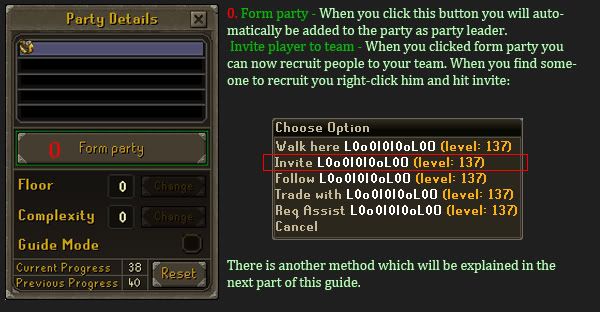
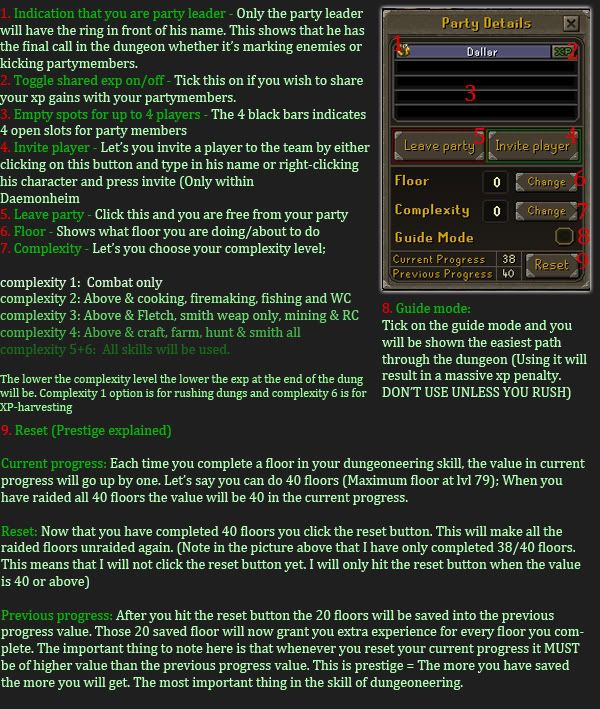
Now you can start your own party. Wield your Ring and kinship, right-click and click "Open Party Interface"
Move on to 2nd chapter to learn about raiding a dungeon!


As soon as your dungeon floor starts you have one goal. The goal is to get prepared for the floor as best as possible which is done by taking everything you can from the table at the base. There really is no order in how to get the things but important is to get something as fast as possible. If you don't get anything you are going to have a limited influence on the gameplay in the beginning. If you fail to get anything from the beginning you have to make sure to be careful while raiding. You should stay in the behind and wait for other people to tank monsters. You can easily help but make sure you don't get attacked and always make sure to have protect prayers at hand. You can then loot food off dead monsters. (Good idea is to get familiar with the F Keys1-5 - IT'S HELPFUL AS HELL) But when you start you have a primary goal which can be seen below. The secondary goal is if you fail to get the items from the beginning. The settled inventory is the best inventory possible when you are done buying and collecting:
Primary:
- Get food from table -
(Cave Morray -> Blue Crab -> Salve Eel -> Bouldabass -> Websnipper -> Giant Flatfish)
- Get any sellable item from the table -
- Sell the item and buy rune essence -
- Craft the essence into law runes (50 at least) -
- Buy a toolbox -
Secondary:
- Get money & food from killing monsters -
- Buy rune essence -
- Craft more law runes -
- Craft Astral & Cosmic runes -
Settled inventory:
- Group Gatestone (If keyer) -
(Group gatestone can be picked up at base in the beginning. No one will take it but the keyer so don't worry about this)
- 150-200 Law runes -
- 50-100 Cosmic and Astral runes -
- Toolbox contents -
(Hammer, Pickaxe, Hatchet, Knife, Vial, Fishing rod and feathers)
- Food -
In the beginning of a dungeon you will find out which role you are gonna be. Most of the time people only talk about the keyer and let the other roles assign automatically. It's up to you as leader to find out how much you wanna plan. Below is a list of the roles that can be assigned:
Keyer: The keyer's job is to open all the doors that has key locks. Normally the team leader is the key'er because he has the ability to mark monsters which is effective when he needs help clearing rooms. The keyer collects all keys found on the floor and opens the corresponding doors. A good idea is to map out the dungeon while keying so you always know where to go if you find a key.
Tool'er: the tool'er always carries around the contents of a toolbox which can be bought for 1350 gp at the Smuggler who stands in the middle of the base of the dungeon. He is responsible for keeping all the tools ready for usage. Usually tooler is combined with skiller for easy approach on opening skill doors.
Skiller: The skiller is the one with the highest total level in a team. His primary job is to open all skill doors in the dungeon. He also stands in charge of brewing potions for skill-doors that requires a potion to open. Skiller are often combined with tooler for easy approach on opening skill doors.
Curer: The curer is responsible for carrying around cure runes (Astral + Cosmic rune). Whenever someone get's poisoned on the team the curer get's called by them to go cure their poison infection. This job doesn't have to be one person only. All teamplayers can do this with very little effort.
Healer: It's rare nowadays that people wants a dedicated healer but it happens. The healer carries around food and helps healing tanks + rushers while they fight off monsters. Healing is mostly an individual matter seeing that food is dropped very often in a dungeon - Enough for all to have a great share.
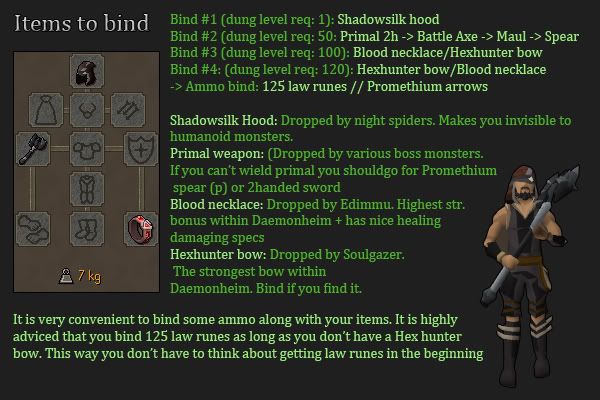
Now you are ready to raid the dungeons. Now you can keep an eye out for some of all the items that you are gonna look for, for more easy approach on the Dungeoneering skill.

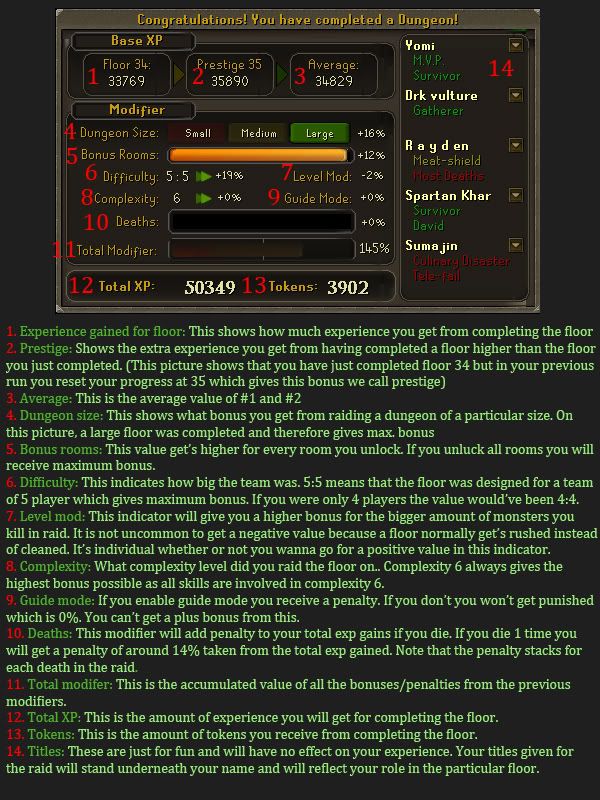
Completing floors in Daemonheim gives you these precious tokens. Tokens that many work to get a ton of and it's obvious because 200.000 of these tokens unlock some of the most brutal weapons ever introduced to Runescape. All the rewards you get from dungeoneering are to be used outside Daemonheim which means that you can't buy items for your dungeoneering inventory (Only thing you can buy as reward that will affect your skill is experience which is bought at 1 token for 1 exp point) Don't do this unless you have bought everything else. Let's take a look at some of the most popular rewards you can buy from the rewards trader:
Chaotic Rapier - Chaotic Rapier is by many regarded as the best chaotic weapon. Due to it's speed and amazing stab bonuses, it can get you through a slayer task very quickly whether or not it's weakness is stab. Many people debate on whether to pick the Chaotic Rapier or longsword as their first weapon and it really is individual what you may think is the best. The Rapier wins in speed but the longsword wins in stats which is a personal preference. You can watch an indepth review of the Chaotic Rapier + a comparison with the longsword here: Chaotic Rapier Vs Longsword PvM Comparison (Comprehensive + Mathematical) Commentary! *REUPLOADED*
Chaotic Longsword - Chaotic Longsword is by many regarded as the best chaotic weapon. Mainly it is because it has impressive offensive stats compared to the Rapier but lacks abit in speed. The Chaotic longswords force is boss-killing which is why many people pick this first. Many people debates on whether to pick the Chaotic longsword or the Chaotic rapier as their first weapon but it's really all about personal preference. You can watch an indepth review of the Chaotic Longsword + a comparison with the Chaotic Rapier here: Chaotic Rapier Vs Longsword PvM Comparison (Comprehensive + Mathematical) Commentary! *REUPLOADED*
Chaotic Maul - Chaotic maul is a beast. With possible hits at around 700 it is feared by many adversaries and is a very popular pick amongst pk'ers who can afford it. Although it is a maul, the Chaotic maul is almost as fast a whip in attack speed which is beastly. The negative things to say about the chaotic maul is that it's all about having fun with massive hits. There are other weapon out there which is a better pick for faster kills. You can watch the Chaotic Maul in action here: Chaotic Maul - Max Hits
Chaotic Crossbow - Chaotic Crossbow is the most powerful one-hand range weapon in the game. With stats very similar to the hand cannon (Although the range attack bonus is +30 more than the handcannon), the Chaotic Crossbow delivers a cascade of deathly hits. There really ain't much to the Chaotic crossbow other than some impressive stats and it has been impossible for me to find a prober review on it. You can, however, watch a video on the crossbows max hits here: Max Hits with Ranged (Rigour Prayer and Chaotic Crossbow)
Chaotic Staff -Chaotic staff will ensure you get the highest magical damge hits in the game due to it's extreme hidden attack bonuses. It has about the same melee (crush) stats as a dragon battleaxe. The debate often lies on whether to pick the Chaotic Staff or the SoL (Staff of Light) because both delivers some useful hidden powers (CS = Hidden damage boosts, SoL = Saves room; More economical) - You can watch a review on the Chaotic Staff here: Chaotic Staff Review with Commentary
Chaotic kiteshield - Regarded as the best shield overall in the game and delivers some specials only to be compared with the expensive divine and eslysian spirit shields. The Chaotic kiteshield comes with a hidden speciality that absorbs up to 7% of all received melee damage and up to 14% of all received ranged damage.
Eagle-eye kiteshield - The Eagle-eye kiteshield soaks up 7% of all received ranged damage and 14% of all received magic damage that would have hit for 200 life points or more. Melee damage is not soaked up at all. Any damage soaked up by the shields will be noted in your chat window. "Soaking" damage lessens the charge on a shield more quickly than usual.
Farseer kiteshield - The farseer kiteshield soaks up 7% of all received Magic damage and 14% of all received melee damage that would have hit for 200 life points or more. Ranged damage is not soaked up at all. Any damage soaked up by the shields will be noted in both your chat window and the chat window of your opponent (if fighting another player). "Soaking" damage lessens the charge on a shield more quickly than usual. It is important to note that a melee hit of 300 won't necessarily end up with 42 points of damage being soaked (in other words, only up to 14% of melee damage and up to 7% of magic damage is soaked for attacks that would have hit for 200 life points or more, not necessarily always 14/7%).
Scroll of rigour - Gives a permanent effect: teaches you the Rigour prayer, which boosts your Ranged attack by 20% and your Ranged defence by 25%.
Scroll of augory - Gives a permanent effect: teaches you the Augury prayer, which boosts your magical attack by 20% and your magical defence by 25%.
Scroll of renewal - Gives a permanent effect: teaches you the Rapid Renewal prayer which restores your life points at 5 times the normal restore rate.
Scroll of life - Gives a permanent effect: When harvesting farming patches (including dead), there is a 10% chance your seeds will be returned to you.
Scroll of cleansing - Gives a permanent effect: Whenever the player creates a potion, they have a 1/8 chance of making that potion twice as fast, as well as a 1/10 chance of receiving a secondary ingredient back.
Scroll of effiency - Gives a permanent effect: Whenever the player smiths an item that requires three or more bars to create, there is a chance that they will retain a bar. This chance is dependent on the bars being smithed.
Gem bag - Holds up to 100 uncut gems (You can only store F2P gems within the gem back
Coal bag - You can use this bag to store up to 27 lumbs of coal. Useful in LRC
Bonecrusher - Bones dropped from monsters will bury automatically
Herbicide - Herbs dropped from monsters will clean and destroy automatically for double the exp than normally.
Anti-poison totem - You can not be poisoned while wielding it in your shield slot. Has defensive bonuses similar to a Rune kiteshield.
This is only a select few of all the rewards from Dungeoneering. A full list of rewards can be found here: http://runescape.wikia.com/wiki/Dungeoneering_rewards

HT (Home-Teleport) - Whenever someone calls HT you teleport home unless they say something is at HT
GD (Guardian-door) - A room which only can be unlocked by killing the monsters within it
GGS (Group-Gate-Stone) - Whenever someone calls out GGS you teleport to the group gatestone (Requires 3 law runes)
GGS-GD (Group-Gate-Stone, Guardian door) - When it get's called out you teleport to the group gatestone to clear a guardian door (Requires 3 law runes)
DE (Dead-end) - When the leader/keyer runs into a dead end he calls DE so you know that you don't need to follow
DENK (Dead end, no key) - When leader/keyer runs into a dead end where no key is found, he calls DENK so you know you don't need to follow
DEWK (Dead end, with key) - When someone runs into a dead end where a key is found, he calls DEWK so you know you don't need to follow but a key is found
CURE (Cure) - When someone calls out CURE, he needs to be cured from poison
Bank: Go here if you need banking. You cannot take anything but the Ring of kinship inside the dungeon.
Rewards trainer: He trades you the cool rewards for tokens. He also is responsible for the repair of your chaotic weapon rewards if they break.
Thok: He is the holder of the dungeoneering cape and an important part of the newly released Fremmenik sagas.
SO when you feel you are familiar with the place you are ready to go!
When you enter dungeoneering there are one thing you must make up with yourself. Do you want to be the host of your own team or would you like join someones team. There are pro's and con's about both but overall being a leader takes alot more responsibility. I'll start this guide out by explaining how to host a team and how all the mechanics work. When you host a team you must realise there are some "unwritten laws" you must abide by in order for it to be a succes..
1. The party leader is expected to be "Keyer" if nothing else has been negotiated.
You can find information on how to be "Keyer" under Raiding a Dungeon -> Team roles.
2. The party leader are responsible for finding solid teams who doesn't quit in the middle of the dungeon.
Be selective when you recruit your party members. You are more than welcome to put level requirements on your teams. These are very popular since people will be more attracted by a level 130 combat level requirement team rather than a mixed team (You might get unlucky and recruit a level 60 combat who won't really contribute to the overall teamwork. Other than that you can require that people have the "Shadowsilk hood" binded. You can find information about this item under Raiding a Dungeon -> Items to go for.
3. The party leader must act mature no matter what personality joins your party.
If you can act mature and have a sense of overall humour, people will find the company nice and you will have an overall better chance of succeeding a dungeon.
Now you can start your own party. Wield your Ring and kinship, right-click and click "Open Party Interface"

Now we can go indepth with the mechanics of the Ring of kinship. Follow the steps beneath and you will be learning about creating parties, how complexity works and what prestige is and how that works.


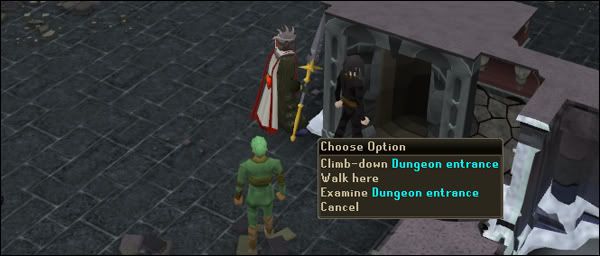
Whenever you and your party are ready you descend into the dungeon by climbing down the dungeon entrance which can be found on right and left side of entrance to the recruitment hall!

Move on to 2nd chapter to learn about raiding a dungeon!

Before doing anything you should open the link below. The tool is very good if you are keying. You'll get the jist of the tool :)

As soon as your dungeon floor starts you have one goal. The goal is to get prepared for the floor as best as possible which is done by taking everything you can from the table at the base. There really is no order in how to get the things but important is to get something as fast as possible. If you don't get anything you are going to have a limited influence on the gameplay in the beginning. If you fail to get anything from the beginning you have to make sure to be careful while raiding. You should stay in the behind and wait for other people to tank monsters. You can easily help but make sure you don't get attacked and always make sure to have protect prayers at hand. You can then loot food off dead monsters. (Good idea is to get familiar with the F Keys1-5 - IT'S HELPFUL AS HELL) But when you start you have a primary goal which can be seen below. The secondary goal is if you fail to get the items from the beginning. The settled inventory is the best inventory possible when you are done buying and collecting:
Primary:
- Get food from table -
(Cave Morray -> Blue Crab -> Salve Eel -> Bouldabass -> Websnipper -> Giant Flatfish)
- Get any sellable item from the table -
- Sell the item and buy rune essence -
- Craft the essence into law runes (50 at least) -
- Buy a toolbox -
Secondary:
- Get money & food from killing monsters -
- Buy rune essence -
- Craft more law runes -
- Craft Astral & Cosmic runes -
Settled inventory:
- Group Gatestone (If keyer) -
(Group gatestone can be picked up at base in the beginning. No one will take it but the keyer so don't worry about this)
- 150-200 Law runes -
- 50-100 Cosmic and Astral runes -
- Toolbox contents -
(Hammer, Pickaxe, Hatchet, Knife, Vial, Fishing rod and feathers)
- Food -
In the beginning of a dungeon you will find out which role you are gonna be. Most of the time people only talk about the keyer and let the other roles assign automatically. It's up to you as leader to find out how much you wanna plan. Below is a list of the roles that can be assigned:
Keyer: The keyer's job is to open all the doors that has key locks. Normally the team leader is the key'er because he has the ability to mark monsters which is effective when he needs help clearing rooms. The keyer collects all keys found on the floor and opens the corresponding doors. A good idea is to map out the dungeon while keying so you always know where to go if you find a key.
Tool'er: the tool'er always carries around the contents of a toolbox which can be bought for 1350 gp at the Smuggler who stands in the middle of the base of the dungeon. He is responsible for keeping all the tools ready for usage. Usually tooler is combined with skiller for easy approach on opening skill doors.
Skiller: The skiller is the one with the highest total level in a team. His primary job is to open all skill doors in the dungeon. He also stands in charge of brewing potions for skill-doors that requires a potion to open. Skiller are often combined with tooler for easy approach on opening skill doors.
Curer: The curer is responsible for carrying around cure runes (Astral + Cosmic rune). Whenever someone get's poisoned on the team the curer get's called by them to go cure their poison infection. This job doesn't have to be one person only. All teamplayers can do this with very little effort.
Healer: It's rare nowadays that people wants a dedicated healer but it happens. The healer carries around food and helps healing tanks + rushers while they fight off monsters. Healing is mostly an individual matter seeing that food is dropped very often in a dungeon - Enough for all to have a great share.
Now you are ready to raid the dungeons. Now you can keep an eye out for some of all the items that you are gonna look for, for more easy approach on the Dungeoneering skill.

When you raid a dungeon you will be faced by different challenges.. Whether it is doors, puzzles or riddles. There is always a skill level requirement attached to it and sometimes you are required to make potions in order to advance to the next room. Below is a chart of the 4 different potions available to boost your skills. You will need to pot in almost every dungeon so take your time to get acquainted with them. That will help you and the speed of the floor you are doing.
When you have raided the entire dungeon (Or as much as you and your teammates skills can take you) you are ready to face the boss. Actually you can fight the boss whenever you encounter him but it is IMPORTANT that you raid as much of the dungeon you possibly can afterwards. Raiding all rooms gives maximum experience and that is what we are going for. Whenever you face the boss there are certain factores you must be aware of with the particular boss you are getting. Below is a chart of all the tactics belonging to the different monsters.
So now when the boss is dead and all possible rooms are raided you can exit the dungeon through the ladder in the boss room!


Completing floors in Daemonheim gives you these precious tokens. Tokens that many work to get a ton of and it's obvious because 200.000 of these tokens unlock some of the most brutal weapons ever introduced to Runescape. All the rewards you get from dungeoneering are to be used outside Daemonheim which means that you can't buy items for your dungeoneering inventory (Only thing you can buy as reward that will affect your skill is experience which is bought at 1 token for 1 exp point) Don't do this unless you have bought everything else. Let's take a look at some of the most popular rewards you can buy from the rewards trader:
Chaotic Rapier - Chaotic Rapier is by many regarded as the best chaotic weapon. Due to it's speed and amazing stab bonuses, it can get you through a slayer task very quickly whether or not it's weakness is stab. Many people debate on whether to pick the Chaotic Rapier or longsword as their first weapon and it really is individual what you may think is the best. The Rapier wins in speed but the longsword wins in stats which is a personal preference. You can watch an indepth review of the Chaotic Rapier + a comparison with the longsword here: Chaotic Rapier Vs Longsword PvM Comparison (Comprehensive + Mathematical) Commentary! *REUPLOADED*
Chaotic Longsword - Chaotic Longsword is by many regarded as the best chaotic weapon. Mainly it is because it has impressive offensive stats compared to the Rapier but lacks abit in speed. The Chaotic longswords force is boss-killing which is why many people pick this first. Many people debates on whether to pick the Chaotic longsword or the Chaotic rapier as their first weapon but it's really all about personal preference. You can watch an indepth review of the Chaotic Longsword + a comparison with the Chaotic Rapier here: Chaotic Rapier Vs Longsword PvM Comparison (Comprehensive + Mathematical) Commentary! *REUPLOADED*
Chaotic Maul - Chaotic maul is a beast. With possible hits at around 700 it is feared by many adversaries and is a very popular pick amongst pk'ers who can afford it. Although it is a maul, the Chaotic maul is almost as fast a whip in attack speed which is beastly. The negative things to say about the chaotic maul is that it's all about having fun with massive hits. There are other weapon out there which is a better pick for faster kills. You can watch the Chaotic Maul in action here: Chaotic Maul - Max Hits
Chaotic Crossbow - Chaotic Crossbow is the most powerful one-hand range weapon in the game. With stats very similar to the hand cannon (Although the range attack bonus is +30 more than the handcannon), the Chaotic Crossbow delivers a cascade of deathly hits. There really ain't much to the Chaotic crossbow other than some impressive stats and it has been impossible for me to find a prober review on it. You can, however, watch a video on the crossbows max hits here: Max Hits with Ranged (Rigour Prayer and Chaotic Crossbow)
Chaotic Staff -Chaotic staff will ensure you get the highest magical damge hits in the game due to it's extreme hidden attack bonuses. It has about the same melee (crush) stats as a dragon battleaxe. The debate often lies on whether to pick the Chaotic Staff or the SoL (Staff of Light) because both delivers some useful hidden powers (CS = Hidden damage boosts, SoL = Saves room; More economical) - You can watch a review on the Chaotic Staff here: Chaotic Staff Review with Commentary
Chaotic kiteshield - Regarded as the best shield overall in the game and delivers some specials only to be compared with the expensive divine and eslysian spirit shields. The Chaotic kiteshield comes with a hidden speciality that absorbs up to 7% of all received melee damage and up to 14% of all received ranged damage.
Eagle-eye kiteshield - The Eagle-eye kiteshield soaks up 7% of all received ranged damage and 14% of all received magic damage that would have hit for 200 life points or more. Melee damage is not soaked up at all. Any damage soaked up by the shields will be noted in your chat window. "Soaking" damage lessens the charge on a shield more quickly than usual.
Farseer kiteshield - The farseer kiteshield soaks up 7% of all received Magic damage and 14% of all received melee damage that would have hit for 200 life points or more. Ranged damage is not soaked up at all. Any damage soaked up by the shields will be noted in both your chat window and the chat window of your opponent (if fighting another player). "Soaking" damage lessens the charge on a shield more quickly than usual. It is important to note that a melee hit of 300 won't necessarily end up with 42 points of damage being soaked (in other words, only up to 14% of melee damage and up to 7% of magic damage is soaked for attacks that would have hit for 200 life points or more, not necessarily always 14/7%).
Scroll of rigour - Gives a permanent effect: teaches you the Rigour prayer, which boosts your Ranged attack by 20% and your Ranged defence by 25%.
Scroll of augory - Gives a permanent effect: teaches you the Augury prayer, which boosts your magical attack by 20% and your magical defence by 25%.
Scroll of renewal - Gives a permanent effect: teaches you the Rapid Renewal prayer which restores your life points at 5 times the normal restore rate.
Scroll of life - Gives a permanent effect: When harvesting farming patches (including dead), there is a 10% chance your seeds will be returned to you.
Scroll of cleansing - Gives a permanent effect: Whenever the player creates a potion, they have a 1/8 chance of making that potion twice as fast, as well as a 1/10 chance of receiving a secondary ingredient back.
Scroll of effiency - Gives a permanent effect: Whenever the player smiths an item that requires three or more bars to create, there is a chance that they will retain a bar. This chance is dependent on the bars being smithed.
Gem bag - Holds up to 100 uncut gems (You can only store F2P gems within the gem back
Coal bag - You can use this bag to store up to 27 lumbs of coal. Useful in LRC
Bonecrusher - Bones dropped from monsters will bury automatically
Herbicide - Herbs dropped from monsters will clean and destroy automatically for double the exp than normally.
Anti-poison totem - You can not be poisoned while wielding it in your shield slot. Has defensive bonuses similar to a Rune kiteshield.
This is only a select few of all the rewards from Dungeoneering. A full list of rewards can be found here: http://runescape.wikia.com/wiki/Dungeoneering_rewards

HT (Home-Teleport) - Whenever someone calls HT you teleport home unless they say something is at HT
GD (Guardian-door) - A room which only can be unlocked by killing the monsters within it
GGS (Group-Gate-Stone) - Whenever someone calls out GGS you teleport to the group gatestone (Requires 3 law runes)
GGS-GD (Group-Gate-Stone, Guardian door) - When it get's called out you teleport to the group gatestone to clear a guardian door (Requires 3 law runes)
DE (Dead-end) - When the leader/keyer runs into a dead end he calls DE so you know that you don't need to follow
DENK (Dead end, no key) - When leader/keyer runs into a dead end where no key is found, he calls DENK so you know you don't need to follow
DEWK (Dead end, with key) - When someone runs into a dead end where a key is found, he calls DEWK so you know you don't need to follow but a key is found
CURE (Cure) - When someone calls out CURE, he needs to be cured from poison
I hope this guide has taught you something about the skill of Dungeoneering. Any feedback on the guide are much apprieciated!
#11
Media and Comedy / WG's hilarious pictures!
June 23, 2011, 06:42:15 PMHilarious Pictures
Post all funny pictures here and let's have a laugh!
Rules:
- Don't post any inappropriate stuff that might offend people such as adult materail or harsh racial pictures -
- Don't post LARGE images -
- Don't post any inappropriate stuff that might offend people such as adult materail or harsh racial pictures -
- Don't post LARGE images -
GO



#13
Achievements / Ultimate 99 achievement topic
June 21, 2011, 11:30:51 AMUltimate 99 achievement topic
Submit your achievement!
Here you can post and boast! If you are one of the dedicated who hunt level 99 in any skill you can post a picture of your achievement here. This is only for sharing with members and a little boasting :-) Have fun.. Note that we have a few guidelines for this to be succesful:
- Post only level 99 gains. All other achievements can be posted in a personal G&A topic
- Post a picture of you getting your 99 level achievement
- Try to keep it as clean as possible. It's not fun to browse pictures when they only appear every 10th post
- Keep the picture-size at around 800x600 pixels. Guide on cropping will be found here soon
- All reservations will deleted. You will end forgetting you did them anyways.
Good luck getting those 99's. Remember to swing by this topic whenever you got the picture ready. Let's make this topic 100 pages long!
Pages1


